
Course Breakdown: The Bear holes 10-14

#10
The 10th is a friendlier way to start the back nine at The Bear. At just over 500 yards and playing a whopping one foot uphill, a few decent swings should give you a look at birdie. The main defense of this hole is the Florida-shaped green. No, it isn’t a perfect representation—but if you squint just right, I’m hoping you see it too.
Off the tee, you're looking at a good-sized fairway that tilts slightly left to right, with a bunker on the left coming into play at 250 yards. If you’re not worried about reaching this bunker, I’d say it should be your target. If the bunker is in play, you'll have to challenge the right side, which requires carrying rough that ranges from 220 to 250 yards, depending on your angle. You don’t want to miss right here—this is mogul city until the 250-yard mark, where it transitions into a hazard area.
A creek runs across the fairway between 100 and 120 yards from the hole and forces you to make a decision. From the 300-yard mark, you’ll need to either hit a 170-yard shot (or less) to stay short of the creek, or a shot that carries 200+ yards to clear it. I’d like to think I’m going for it more often than not, but a bad drive can quickly change that plan.
The Florida-shaped green is one of the smallest on the course and is squeezed between four bunkers. The pin location should heavily influence your strategy. A back or middle pin is more forgiving and allows you to come in from nearly any angle. But if the pin is in the front-right section (South Florida), you simply cannot be pin high or long. I’d try to leave myself a shot in the 50-yard range for that pin placement.

#11
The 11th hole at The Bear continues the trend of a forced layup, making this ~360-yard hole play longer than it looks on the card. Here, the fairway cuts off at 245 yards and resumes again at 260 yards. Personally, my best drives can carry the hazard—but there's a 0% chance I’ll hit driver on this hole. I’ll hit my 230 club and be left with some sort of short iron.
The left side of the fairway gives you a much better angle compared to the right, but this is one of the few holes where you’ve actually got a decent chance of getting up and down from around the green.
That said, your preferred miss is short and left—if you can help it.
The green complex tilts slightly left to right, and if the pin is in the back-right corner, play it safe and aim for the middle of the green. This section is the most dramatic, and leaving yourself short-sided here could be the dynamite that blows up your round.

#12
When someone mentions The Bear, this is one of the first holes that comes to mind. This downhill par 4 starts off wide open but begins to pinch in with hardwoods around the 200-yard mark. At that point, the fairway is still relatively wide at 37 yards, but it continues to narrow as you move forward, eventually reaching a water hazard at 270 yards—where the fairway tightens to just 20 yards wide. This hole screams risk-reward in the best way possible.
Because the approach shot is entirely over water, golfers often get overly aggressive off the tee in hopes of setting up an easier second shot.
You definitely don’t want to miss into the left hardwoods. From there, you're looking at a terrible angle, and hitting a single leaf could be enough to knock your shot down into the water. This hole is designed for a left-to-right tee shot, using the space behind the right trees that opens up a clean look at the green.
Like so many other holes at The Bear, I’ll be hitting my 230 club and accepting a longer shot over water, even if it's not the ideal distance.
On your approach, avoid missing left again. A downhill chip from the trees onto a green sloping away from you—and toward the water—is not a recipe for success. This hole may not be long, but trouble lurks around every corner. Tread lightly!
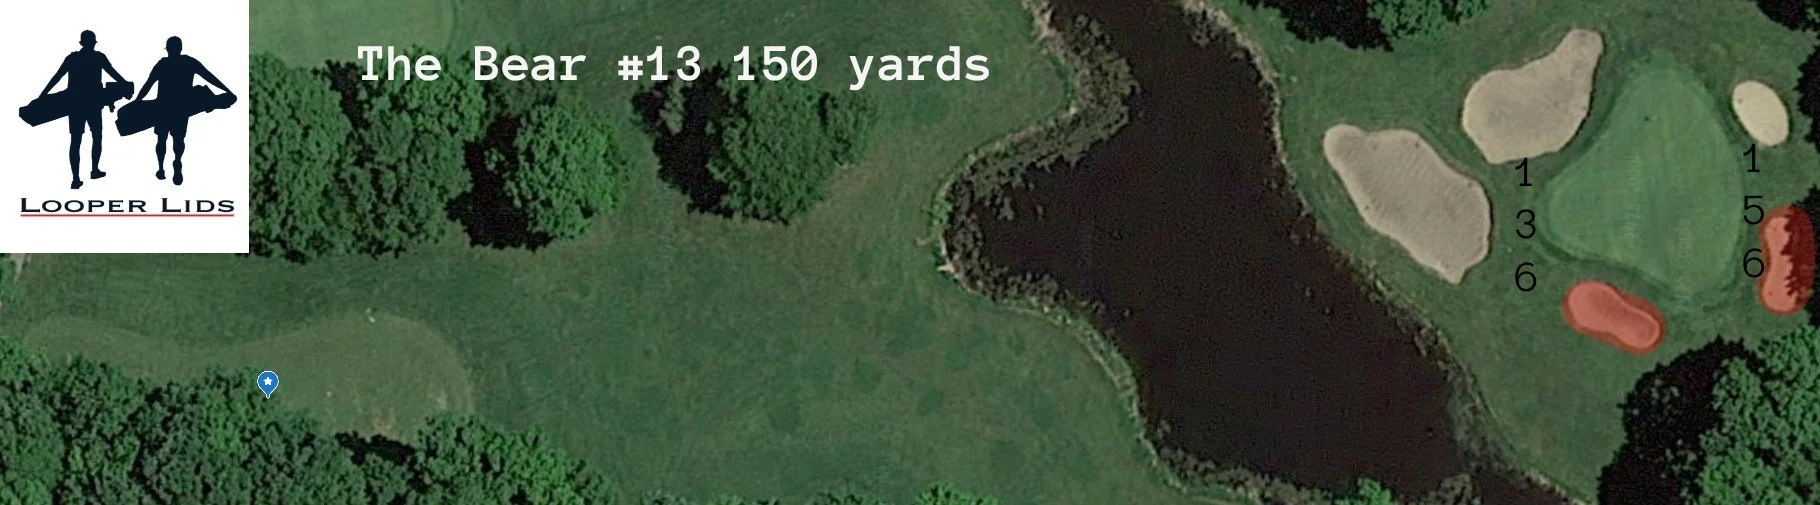
#13
The 13th has got to be one of the coolest spots on the entire golf course. From the tee, you can do a full 360 and all you'll see are 100+ year-old hardwoods, with the green perched up about 150 yards ahead. If you're a shy urinator, this hole is your salvation.
This triangle-shaped green starts off very skinny and gets wider and wider as you move toward the back. It slopes from the back-right corner to the front-left—and if you’ve been reading these breakdowns, you should know what that means.
—pause for dramatic effect—
That’s right: don’t miss right! Especially not long and right into the back bunker—yikes.
One thing to note is that the prevailing wind tends to be into you. But because the hole is so enclosed, the wind shouldn’t affect the ball too much unless you’re hitting it above the tree line. Not an issue for most, but if you're reading this before playing in the Michigan AM, consider that your insider tip.
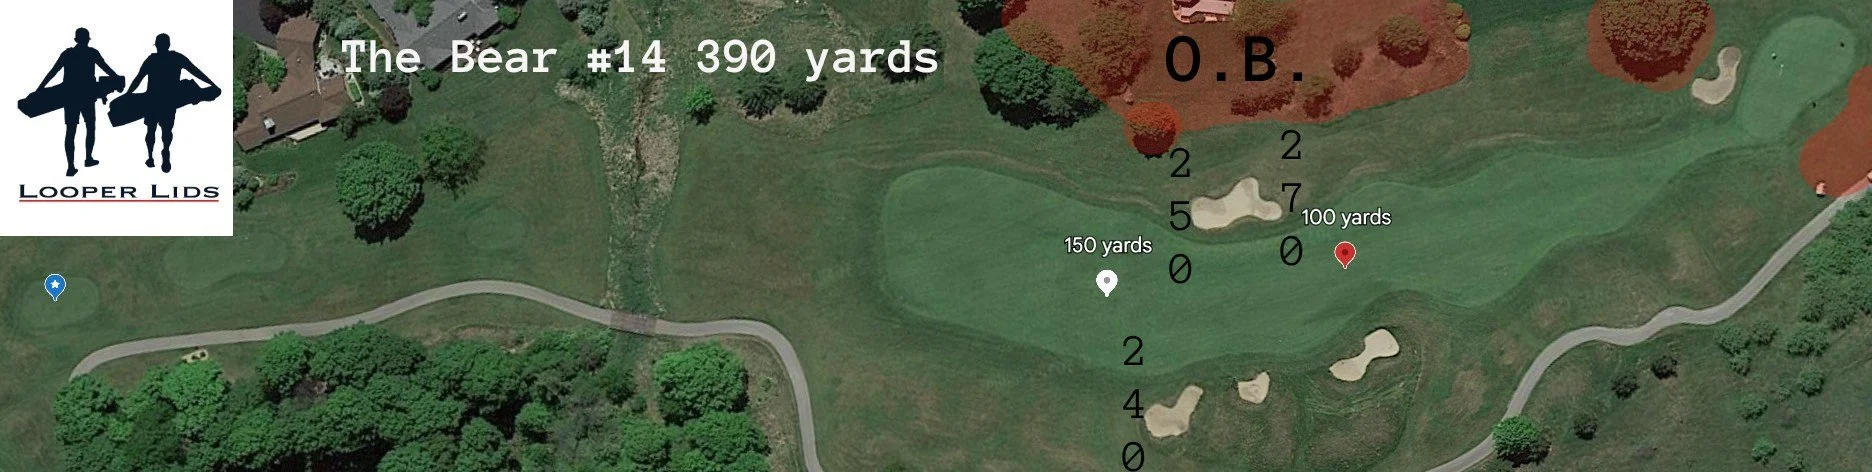
#14
The tee shot on the 14th is one of the most uncomfortable on the entire golf course. The giant hardwoods surrounding the prior par 3 enclose the right side of the hole, while out of bounds (OB) quickly comes into play on the left. With overhanging branches to the right, this tee shot simply gives me the heebie-jeebies.
One strategy to combat this is to tee your ball up from the far left side of the teeing area. For my righties out there: only your ball needs to be within the teeing area—you can stand outside of it to position yourself as far left as possible.
If you feel confident hitting a left-to-right shot, I think driver is fine. But if that’s not your preference, use a club that stays short of the 250-yard bunker on the left.
On your approach shot, remember to add yardage for the uphill slope and prevailing headwind. From 100 yards out, add 4 yards; from 150 yards, add 6. Be especially careful of the left greenside tree—it loves to swat balls that land just left of the green, often leaving you in a horrendous position to get up and down. The right side is the smart miss on this approach.