
Course Breakdown: The Crown holes 1-5
The Crown Intro
When I think of Traverse City public golf courses, the first two that come to mind are Elmbrook and The Crown. Truth be told, these courses share a lot of similarities, and I’d be very interested to hear which of the two locals prefer. Personally, I’ve always leaned toward Elmbrook—but for reasons that don’t have much to do with the design or condition of the courses.
The Crown is a little more “proud” of their course, and it’s not the best option if you prefer to walk, since there are some long distances between holes as the layout weaves through a housing development. Before COVID, The Crown had a great locals’ special where you could play 18 holes with a cart for $35. I’ve been denied that deal a few times over the years, and I’ll have a hard time justifying the $105 peak-season rate (with cart) to play there this summer—especially when Elmbrook is still just $35 to walk.
This breakdown is based on the blue tees, which play around 6,200 yards. The spot I’ve measured from is marked by the blue tag with a star. The front nine is relatively straightforward, but the back nine features some very tricky golf holes. Be sure to check back as the full breakdown rolls out every Wednesday.
Let’s dive in!

Hole 1: A Friendly Start
The first is a relatively easy par 5 to get you warmed up—definitely Greg-approved. There's a bunker on the right that's 205 yards to reach and 230 to carry. On the left, a power line marks the boundary between in play and long, thick heather grass. You’d rather flirt with the bunker than mess with the left side.
With this hole playing just under 500 yards, a solid drive gives you a chance to reach the green in two. Shout out to Michael, who’s only played here once but went driver–4 hybrid to 8 feet and drained the putt for eagle.
If you’re going for the green, it's better to miss right than left. You really don’t want to end up in the cluster of bunkers short and left of the green.
If you're laying up, I’d suggest staying short of the right fairway bunker and leaving yourself a shot from 75–110 yards. From the 250-yard marker, that bunker is 186 yards to reach.
The green is guarded by two bunkers that pinch the left and right sides, effectively separating the front and back halves.
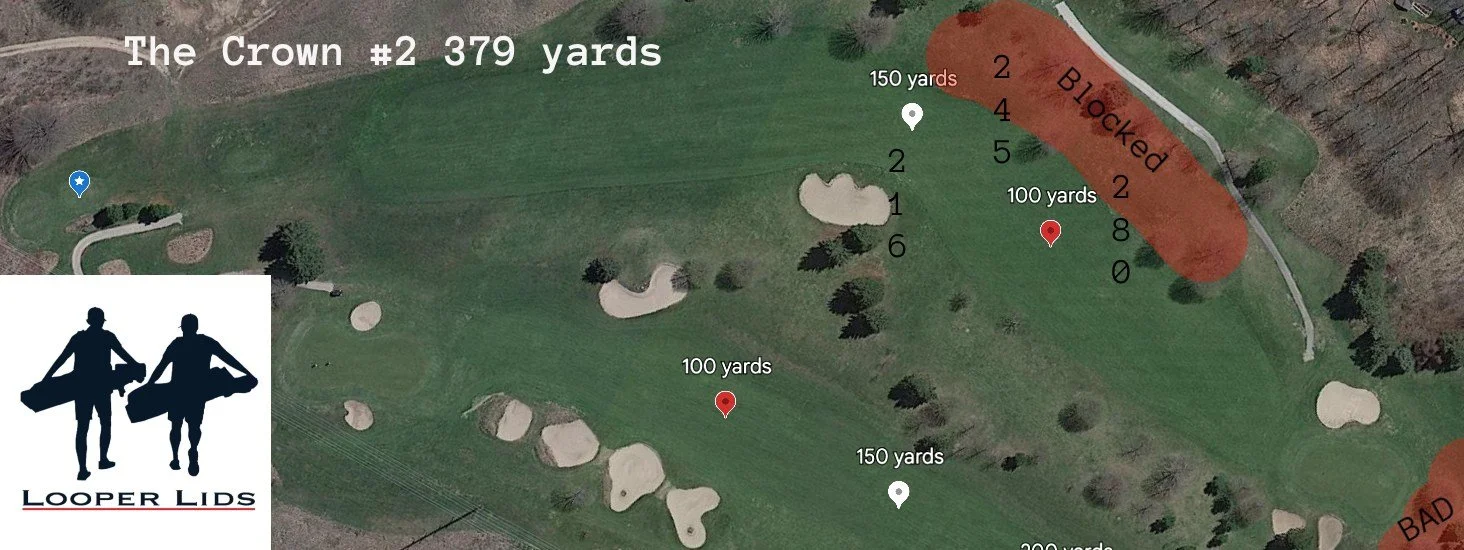
Hole 2: Dogleg Drama
You go from the dead-straight 1st hole to one of the most dramatic dogleg-right holes I’ve ever played. I’ve played holes that turn sharper, but this one forces you to shape your shot to fit the design, rather than just flying the ball over the dogleg. A few pine trees next to the tee box block your ability to take a more direct route.
Pro tip: Tee up on the far left side of the box to get the best possible angle.
Because of those pine trees, you have to make a decision on how to attack this hole. If you naturally hit a left-to-right shot, you can be more aggressive and try to cut the corner. But if that shape isn’t in your bag, your best bet is to hit a shorter club and avoid running through the fairway into the trees. A 230-yard shot just left of the bunker will leave you with ~150 yards or less.
On your approach shot, the worst place to miss is long. The terrain feeds away from the green and into the trees. Fortunately, the green is pretty flat, so any miss other than long gives you a solid chance to get up and down.
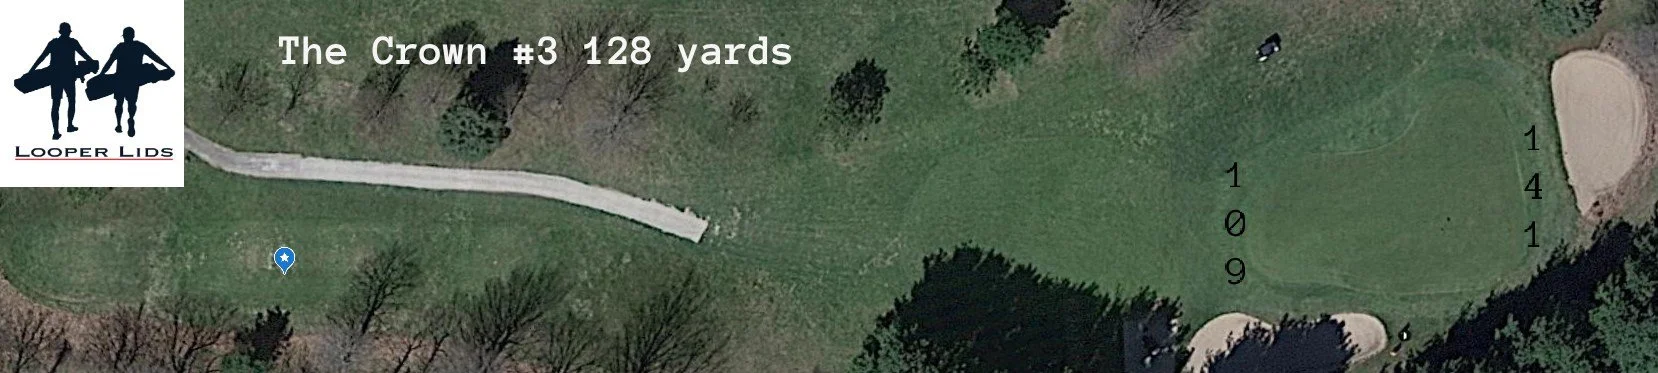
Hole 3: Short and Sweet
The 3rd is a great little par 3 that gives you a wedge or short iron into a pretty inviting green. The left side kicks down toward the green, but if you leave your approach up on that slope, you might be facing a testy downhill chip. Still, that’s a much better outcome than ending up in the right bunker—or worse, missing even further right.
The only tricky part of this tee shot is the wind. It's usually downwind, but you might not feel it with the tee box tucked away among the trees.
The green slopes gently from left to right and isn’t too tricky overall. This is probably the easiest hole on the course—so don’t screw it up!
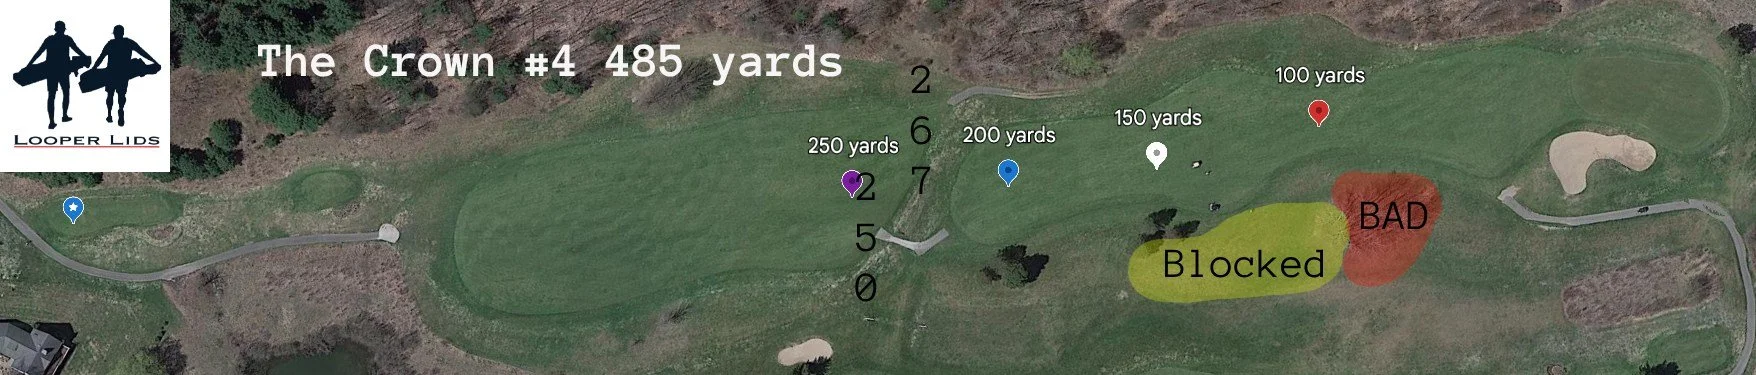
Hole 4: Risky Business
The second par 5 on the front is even shorter than the first, but a trench cuts through the fairway between 250 and 267 yards from the tee. I don’t feel confident carrying it every time, so I lay up short and live with the fact that I’m never going for this green in two. My go-to strategy is hitting 5-wood off the tee, then again for the second shot, which leaves me with less than 50 yards into the green. Even that might be a bit aggressive for most players.
If you check the overhead view, you’ll see the fairway widens and narrows in certain spots. The tightest area is between 115 and 75 yards from the green—and it’s definitely not where you want to lay up. If you need to lay back, aim for around 125 yards. But if you’re confident you can clear that narrow stretch, go ahead and let it rip.
The green complex sits about 10 feet above the fairway, so you won’t be able to see your ball land. The green slopes from left to right, with a ridge dividing the higher left tier from the lower right side. Be careful—missing left can lead to runaway chip shots you do not want to deal with.

Hole 5: Shape It or Play It Smart
Like the 2nd hole, the tee box on the 5th limits your ability to access part of the fairway unless you shape your shot. This time, pine trees lining the left side force you to aim up the right half of the fairway.
Luckily, there’s plenty of room to work with—up until about 280 yards, when the rough starts creeping in and the water hazard comes into play around 300 yards. I typically go with my 250-yard club off the tee to stay safe.
The green complex slopes from left to right and gives you more room to miss left than right. That said, missing left will leave you with a downhill chip—but that’s still better than ending up right of the green, which is trouble.