
Course Breakdown: Emerald Vale
Emerald Vale is next up in our golf course breakdown series, and I’m especially excited for this one—it’s where my earliest golf memories were made. Aside from the Kingsley Club, Emerald Vale is actually the closest course to where I grew up. I could make it from my front door to their parking lot in about 15 minutes. Fun fact: the cart barn at Emerald Vale was also my first real job—the first one that didn’t involve my grandpa critiquing my every move.
The course itself features one of the best layouts in Northern Michigan, and I stand by that. There’s a lot of variety in the hole designs, with a balance of fun and challenge that keeps things interesting. The issue at Emerald Vale has always been inconsistent course conditions. When the weather cooperates, the course shines like an emerald—but with too much or too little rain, the conditions don’t quite match the quality of the design.
This breakdown is from the blue tees, which measure a little over 6,400 yards. The course is plenty wide, but if you stray into the hardwoods or long heather, Emerald Vale shows its teeth. So, the goal here is simple: help you make smart decisions to avoid the trouble spots and play your best round.
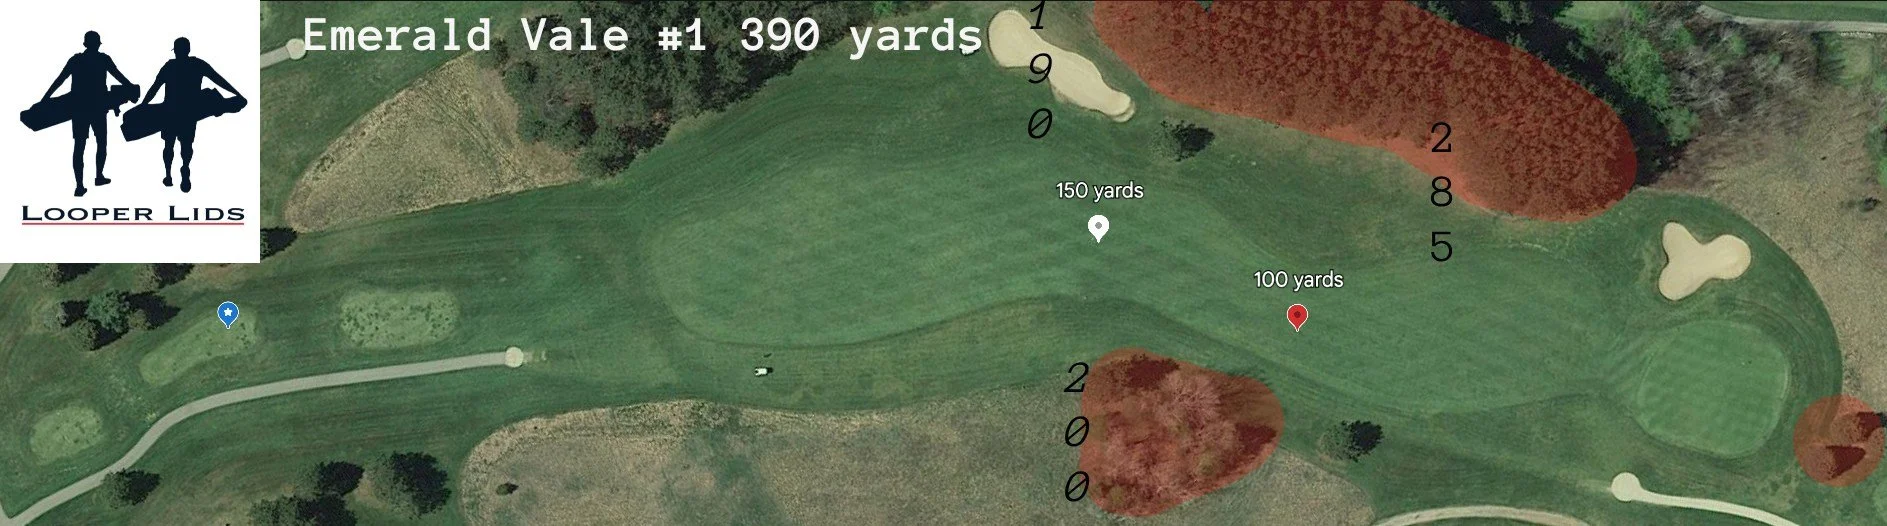
The opening hole at Emerald Vale is a slight dogleg right, with trouble looming on both sides of the fairway. Off the tee, the left bunker—right where the tee box points you—is just 190 yards out, with hardwoods trailing behind it. This is not where you want to miss.
On the right, a grouping of trees starts around 200 yards from the tee and continues to about 240. The ideal corridor off the tee is between the solo tree on the left (just right of the bunker) and that right-side tree line. Personally, I often find myself in the left rough—but that’s perfectly fine, as it still offers a good angle into a receptive green with no trouble short.
The green complex slopes from the front-left corner to the back-right, but since it sits well below the fairway, don’t expect much rollout on a well-struck approach. If you're between clubs, I’d lean short—better to be chipping from the front than flirting with the pine trees behind the green.

At 562 yards, the par-5 2nd at Emerald Vale demands three well-struck shots just to reach the green in regulation. It’s one of the toughest driving holes on the course because of all the trouble lurking in the landing zone.
The fairway is at its widest—32 yards—between 190 and 230 yards off the tee. But from there, it tightens dramatically, pinching to just 14 yards between two bunkers at the 240-yard mark. These bunkers aren’t just eye candy, either; they’ve got big, steep lips that limit your ability to advance the ball if you end up in one.
Go long and left, and you’ll find hardwoods that completely block your angle up the fairway unless you can shape a hard right to left shot. A miss right gives you a better angle—for a bit—until you're blocked by another stand of trees about 265 yards from the tee.
All of this adds up to a clear choice:
-Lay up short of 240 to the fat part of the fairway, or
-Get aggressive and take on all the risk.
Old, naive me? I used to blast driver and live with the consequences.
More mature, 31-year-old me? I’ll hit 5-wood off the tee, then another fairway club to try and get close to the 100-yard marker. I can’t count how many times I’ve messed up this hole by getting greedy and found myself 2 or 3 over after 2 holes and needing to par out to shoot under 40 on the front.
The hole slopes downhill and to the left almost the entire way—and it feels like it goes on forever. Trouble lines the entire left side, but things open up a bit on the right once you’re inside 200 yards.
The green is massive—45 yards deep—and they’re not shy about using all of it. It slopes right to left, so make sure you've got your yardage dialed in for your approach.
I’d argue this is one of the toughest holes at Emerald Vale. If you walk away with a par here, you’re definitely ahead of the curve.
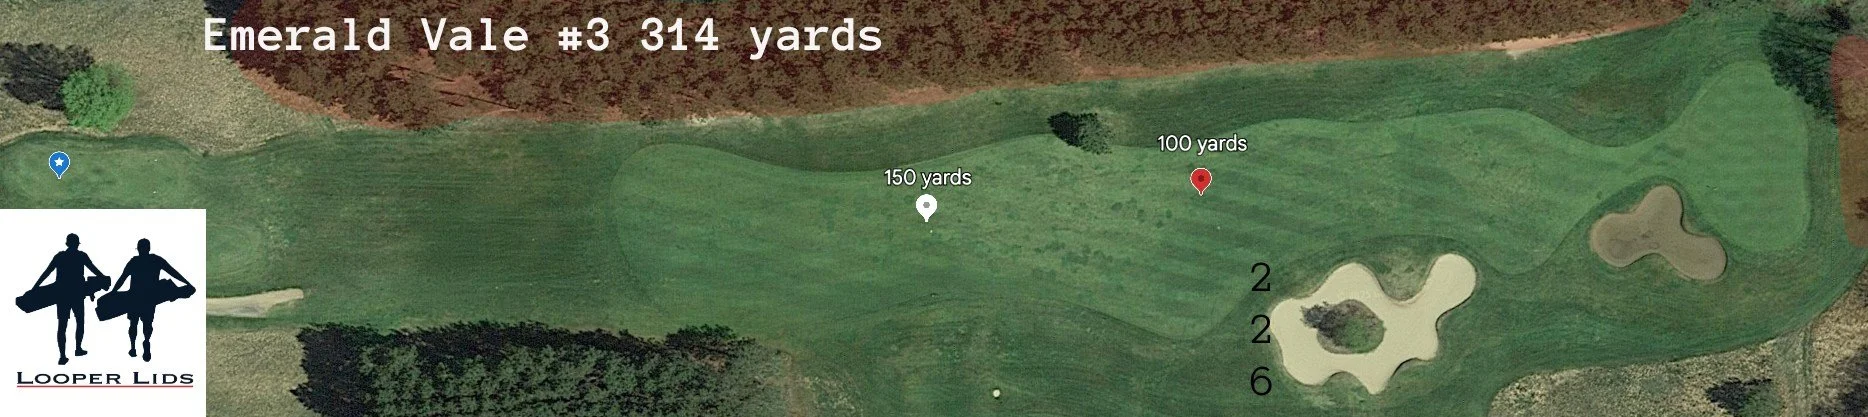
After the ass-kicking most golfers take on the 2nd hole, the short par-4 3rd is the perfect “get right” opportunity.
This is another hole where I leave the driver in the bag—and I’d recommend the same for anyone who can reach the right-side bunker at 226 yards. The left side is tree-lined with large pines, so it’s smarter to aim up the right side. If you miss, miss right—not left.
A smooth 200–220 yard tee shot will leave you with a wedge into an oval-shaped green. Just one major warning: you absolutely cannot miss long.
The only other bit of trickery comes from a subtle spine on the green that runs from the middle-left down to the front-left. If the pin is placed on or near this ridge, putting can get dicey. If you have to putt over it, tread carefully—speed control is everything.
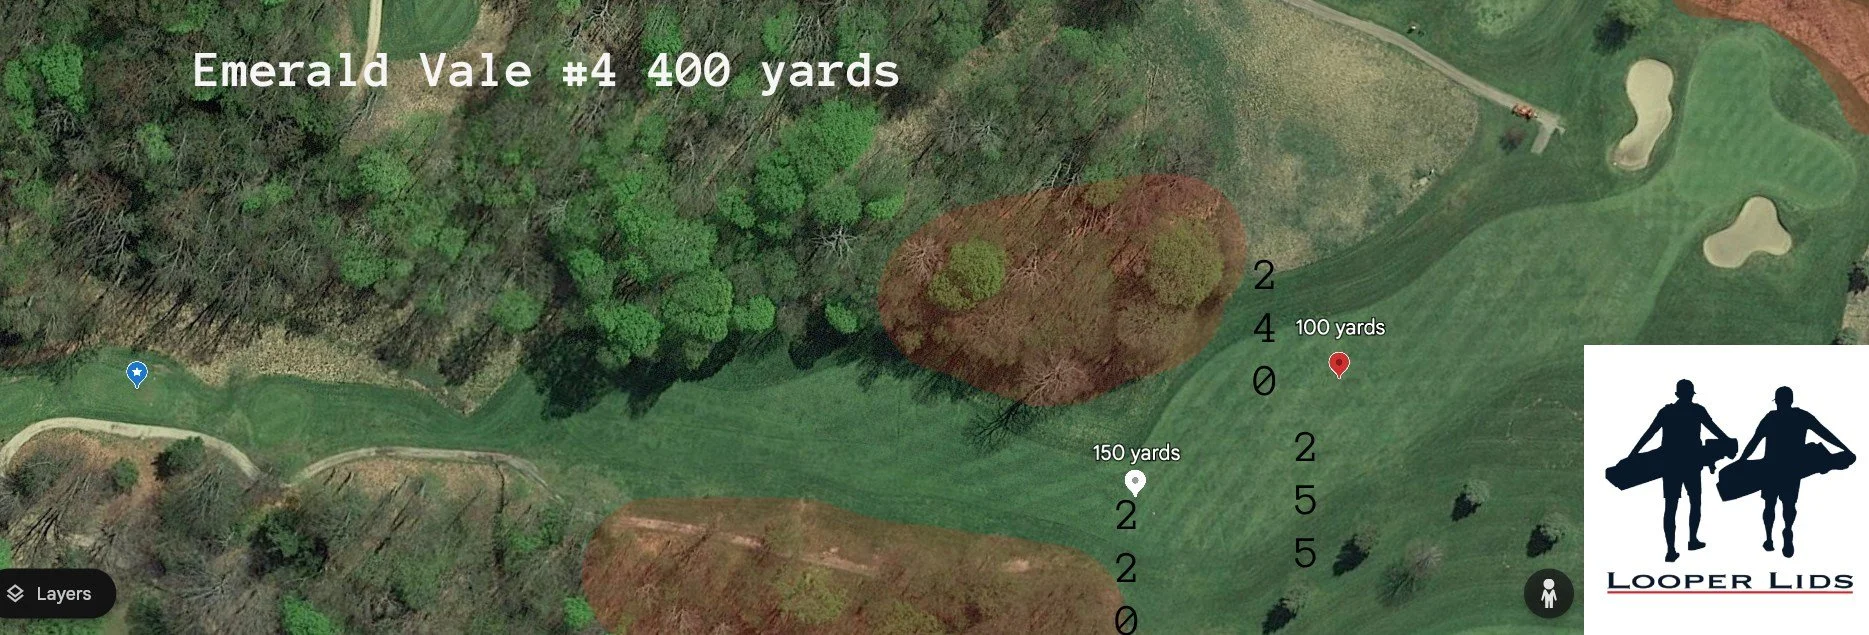
The tee shot on the tough par-4 4th hole is what makes or breaks your success here. It’s a dogleg left, but the turn doesn’t start until around the 220-yard mark. Before that, you're aiming straight down a narrow chute between trees that line both sides of the fairway.
A dead-straight shot runs out of room at 255 yards, so a right-to-left ball flight is definitely preferred. The key is simply to make it past the dogleg—do that, and you can survive from there.
Big hitters can take aim over the left corner, but be warned: you’ll need to carry the ball at least 240 yards, and that shot has to clear an 80-foot tree. It’s high-risk, moderate-reward.
The green is fairly large with a few distinct sections, but the center works well for just about any pin placement. And like most holes at Emerald Vale, short is a better miss than long.
When mapping this hole out before writing this review, I had to triple-check to confirm it actually plays uphill—about 7 feet from tee to green. Based on my memory, I never would have guessed that.
The green is large but visually deceptive, tucked behind a sizable bunker that dominates your view off the tee. From the back side of that bunker, the green slopes downhill before flattening out and then gradually rising again toward the back edge.
Staying consistent with the theme at Emerald Vale, long is a bad miss here—four large pines guard the back of the green and make for a tough up-and-down. The hole also slopes somewhat severely from right to left.
Take all that into account and your best play is to hit something safely to the middle of the green, two-putt, and walk off with your par.
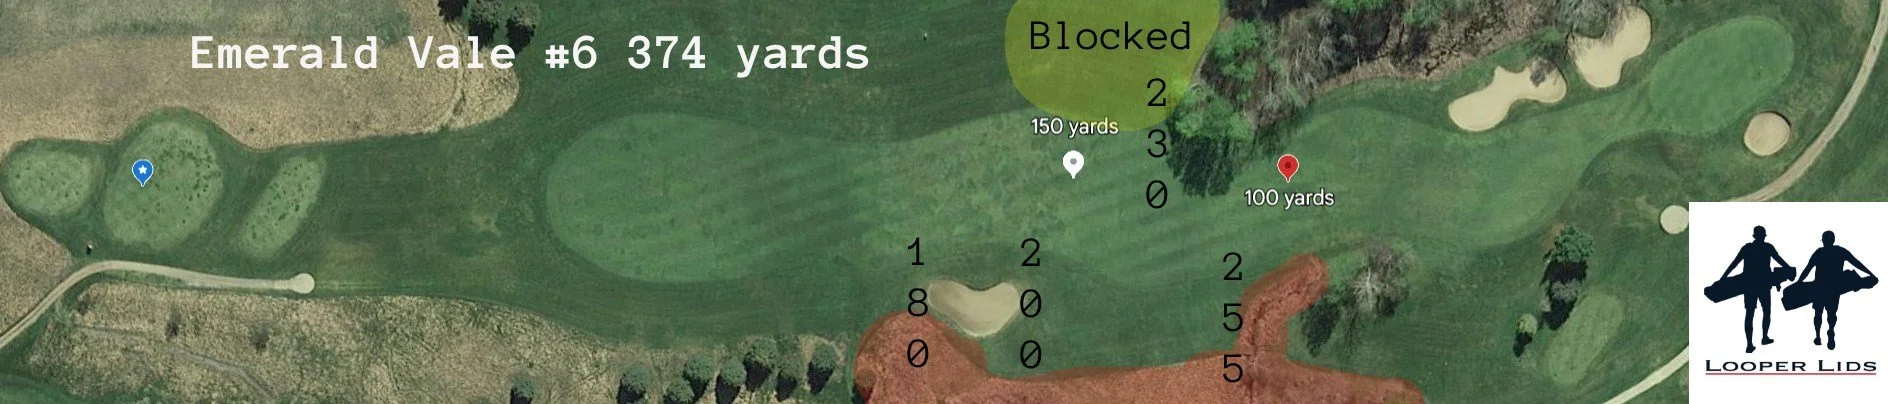
The par-4 6th looks pretty friendly from the tee—and it is, as long as you find the fairway. Anywhere else, and you’re facing an uphill battle to score well.
The left side is wide open until about 230 yards, where hardwoods come into play. These trees block your angle into the green unless you’re safely in the fairway. I’ve marked this area yellow to show where you're likely blocked out. I still remember a high school tournament where I missed left and had to chip the ball straight right—and slightly backward—just to get a clear shot at the green.
This might tempt you to favor the right side, but there’s trouble there too. A creek at 255 yards keeps me from pulling driver, but I still need to clear the bunker at 200 yards. I almost always go with my 220 club to land in the fattest part of the fairway.
The approach plays about 10 feet uphill, so be sure to tack on an extra 3–4 yards. I prefer missing right over left and usually take a pretty aggressive line into this green. It slopes steeply from back to front, and missing just left or right often kicks the ball toward the center. You can swing confidently here—you don’t need to be perfect.
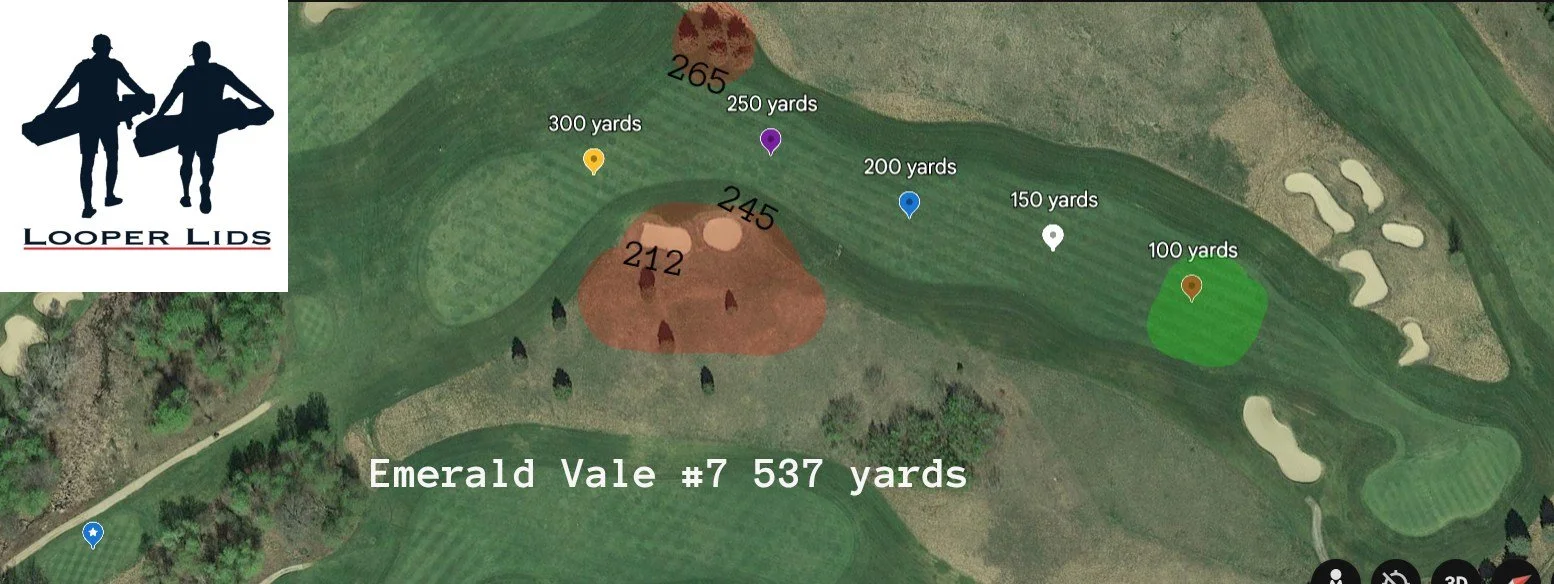
As a lefty who prefers to hit a right-to-left shot off the tee... I hate this tee shot. The par-5 7th is a dogleg right that wraps around a set of bunkers—212 yards to reach, 245 to carry. I can carry that bunker, but the tee box is tucked so tightly next to trees on the right that I don’t have much room to hit the shot I’m comfortable with.
I could aim farther left and play it safer, but that brings a set of pine trees through the fairway into play. This hole is my nemesis—it even finds a way to punish my well-struck shots. I have to believe most golfers should pull driver here, but for me, it’s usually not the right play. One thing we can all agree on: don’t miss right of the right bunkers. That’s where the long, gnarly heather lies in wait, ready to swallow golf balls whole.
Past the bunkers, the fairway slowly narrows until it becomes very tight around the 80-yard mark. The smart layup zone is somewhere between 110 and 80 yards. This hole is lined with long heather so try to keep in down the middle.
The green is large and slopes from back to front. The right half sits below a hillside, making it completely blind unless you're coming in from the far left side of the fairway.
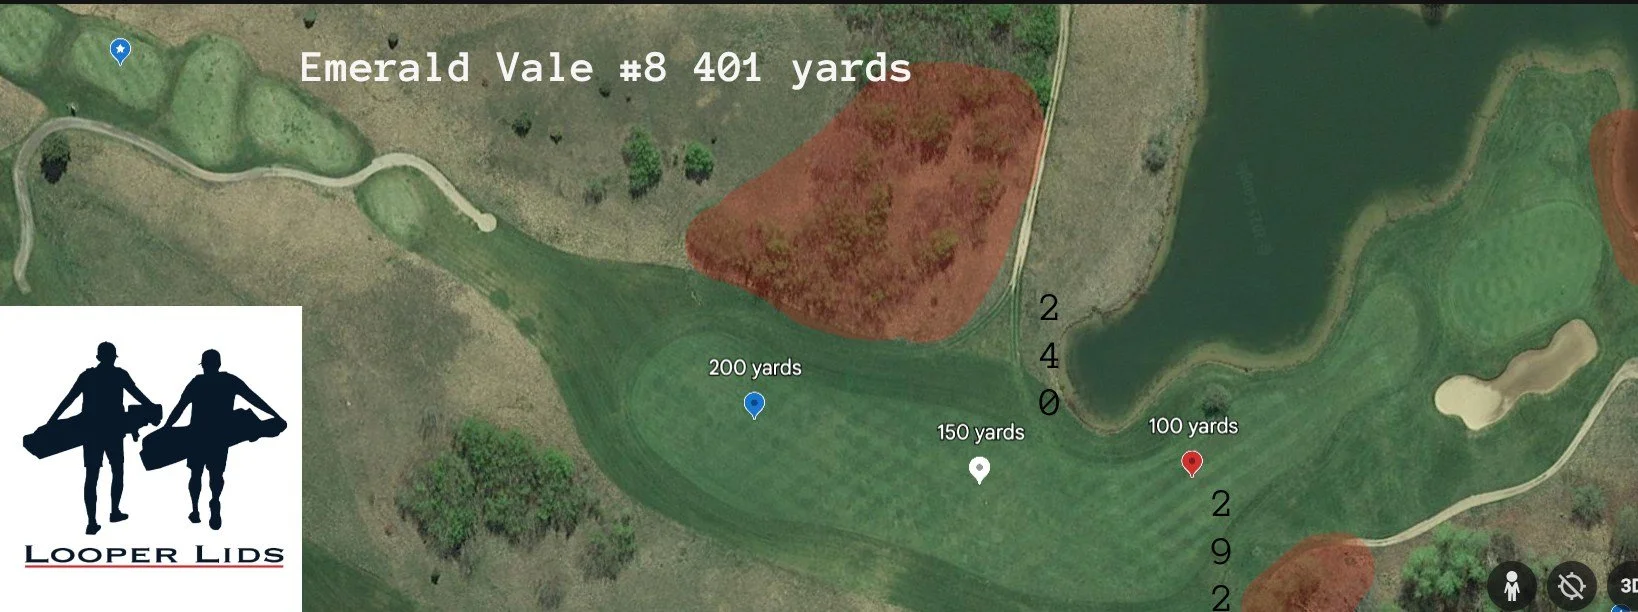
The 8th might be the best hole at Emerald Vale. It’s been interesting to watch this hole “grow up” over the years. What used to be an open field with saplings on the left has transformed into a dense stand of tall trees—completely blocking the once-clear view of the green from the tee. That change adds a layer of mystery, especially for first-time players.
The tee shot gives you options, but the key is staying short of or away from the water. The pond begins about 240 yards out from the blue tees at its closest point. You can either lay back and hug the left side or take driver and aim down the right side of the fairway—away from the green on this dogleg left. There’s plenty of room out there, as the fairway doesn’t end until around 290 yards. Personally, I like to keep it short of the water. I came here to golf, not swim.
The green complex is large and slopes left to right. There’s ample room to miss left or short, but long is sneakily the worst miss—the pond wraps behind the green and sits just a few paces beyond it. From the fairway, the water long is mostly hidden, which makes it even more dangerous. The right bunker isn’t ideal, but since you’ll be hitting into an upslope, you’ve got a good chance to get out unscathed.
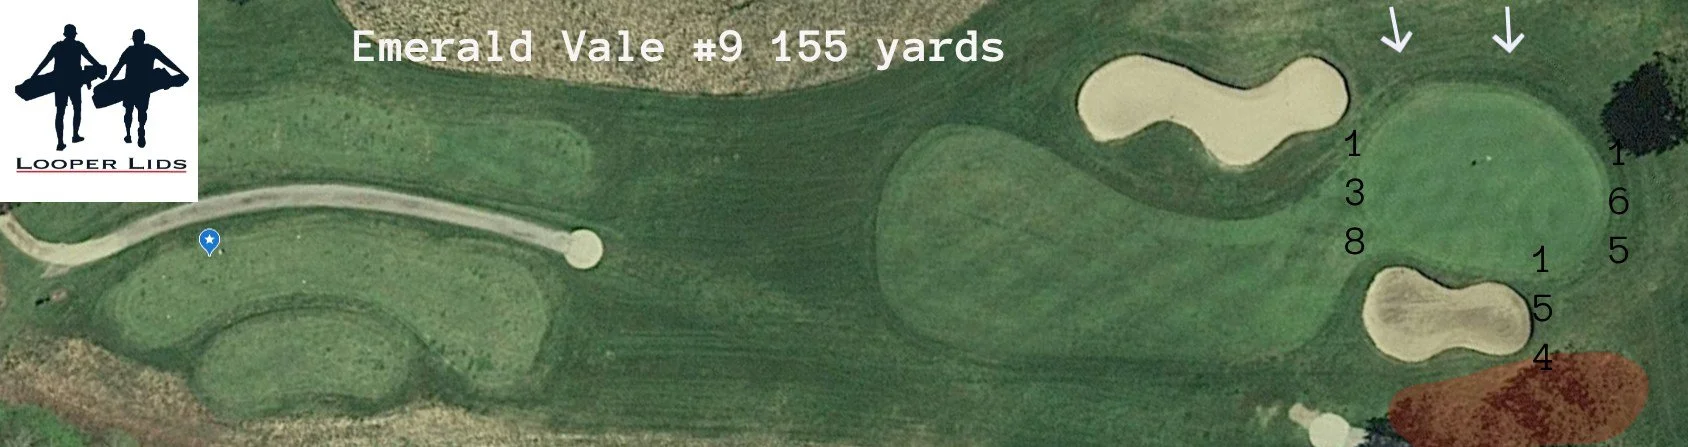
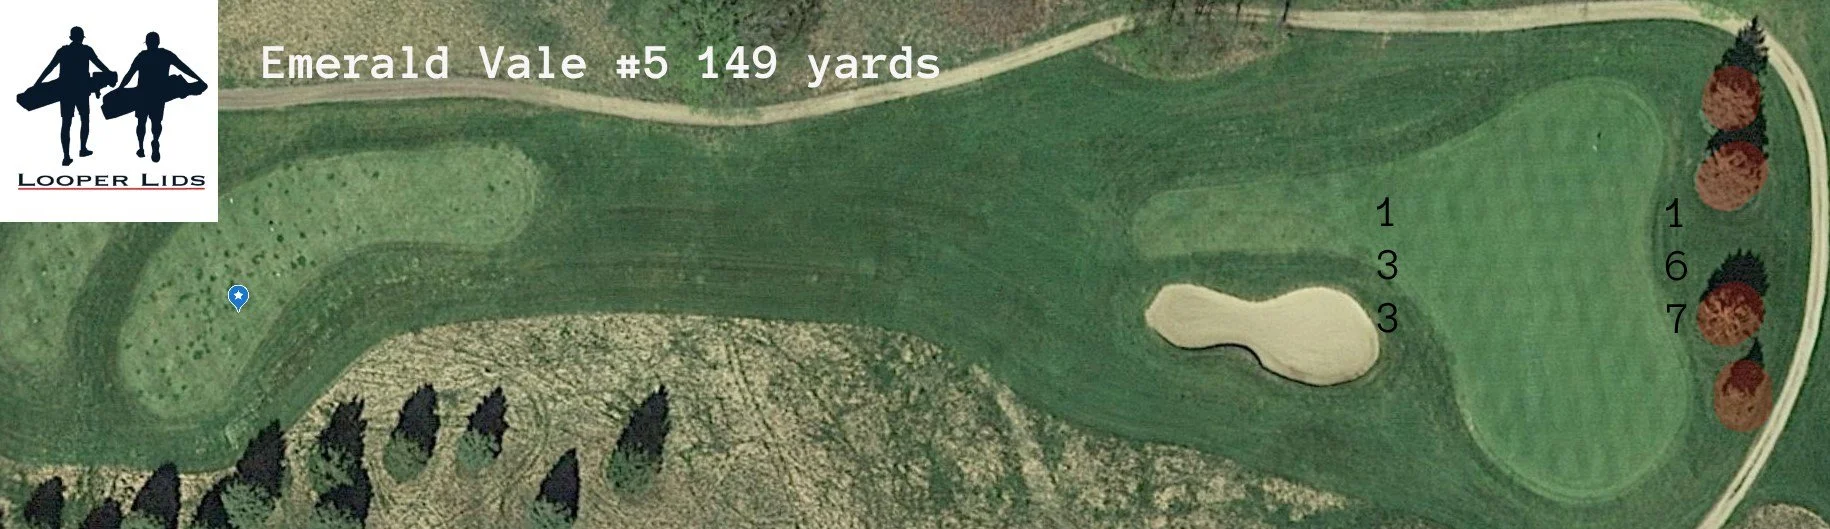
The 9th is a fitting end to the tougher of the two nines. This uphill par 3 doesn’t offer much to look at—just bunkers left and right, and not much room for error. The elevated terrain on the left side of the hole hides part of the green from view, but the good news is that it slopes dramatically down toward the putting surface. I’ve seen plenty of fortunate bounces from over there.
The right bunker runs nearly the entire depth of the green, and honestly, I find it more often than the green itself. Miss even farther right, and you're in real trouble. Picture this: you're under overhanging branches with a long bunker between you and the green. Easy shot, right?
The safe play is just left of center. Don’t be afraid to club up a bit to account for the elevation. This amphitheater-style green is pretty forgiving—especially if you’re long or left.
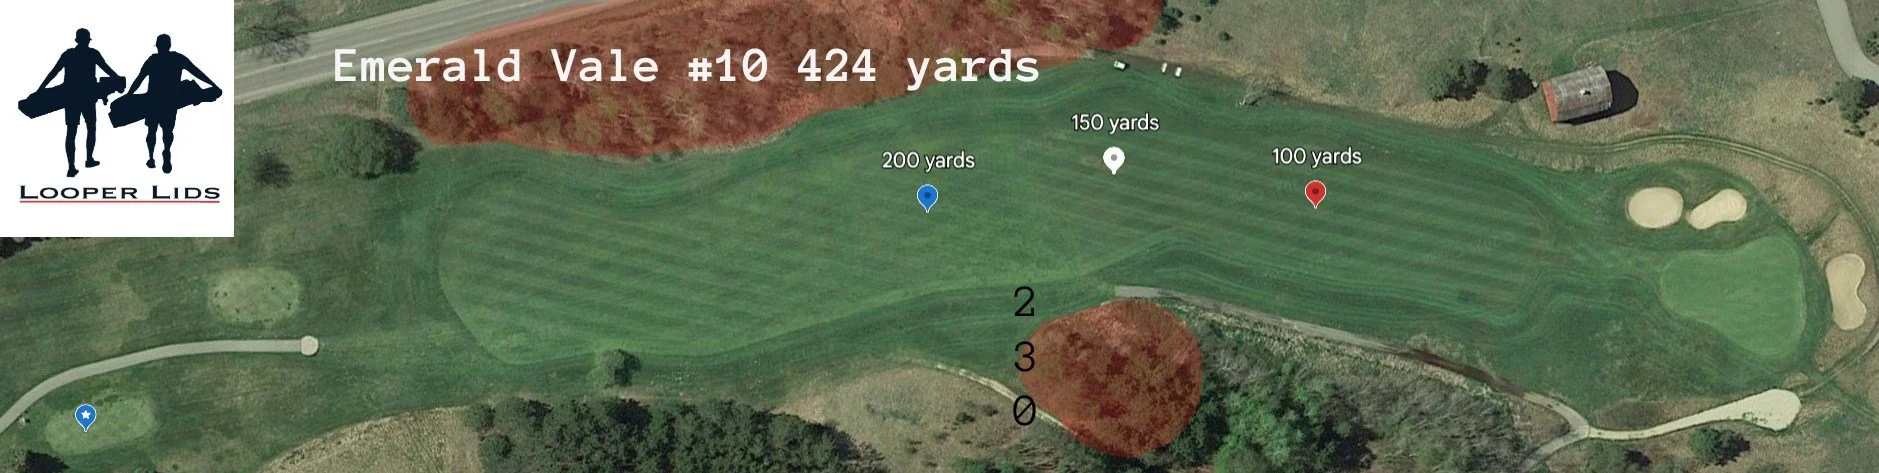
When comparing the front nine and back nine, I find the back nine to be quite a bit easier overall. What’s odd about that, though, is the fact that the 10th hole is definitely the hardest hole on the entire course. It just goes to show—if you can survive the 10th, you're setting yourself up for a great back nine!
The long par-4 10th starts with a fantastic elevated tee box, sitting about 30 feet above the fairway. While the view gives you a clear sense of what’s required for a successful shot, execution is always the tougher part of that equation.
Trees line the entire left side of the hole, but they're hard to reach since the tee box sets you up from the far right side. The right side is more forgiving—until around the 230-yard mark, where dense vegetation takes over the rough. That’s the number one spot to avoid off the tee.
Your ideal aim point is the left edge of the big red barn.
The approach shot plays about 10 feet uphill, so it’s smart to add an extra 5 yards to your distance to compensate. My biggest concern here is missing long and right of the green. As a left-handed player, my misses to the right tend to carry a little further—and unfortunately, that quickly brings some tall grass into play. The bunkers might look intimidating, but they’re actually a much better miss than ending up long and right, which I (wrongly) tend to prefer.
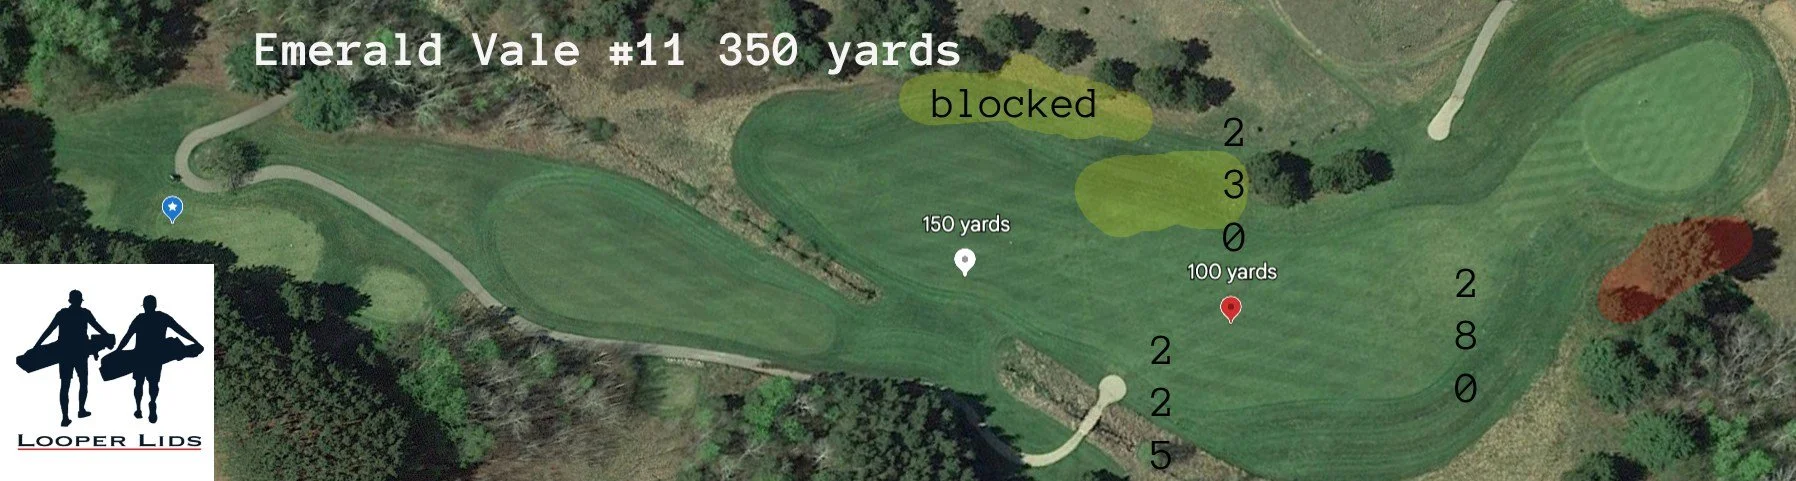
The 11th is a shorter par 4 that punishes golfers who mindlessly reach for the driver and don’t have a plan of attack. Off the tee, you’ll likely feel a bit claustrophobic—the overhanging hardwoods just right of the tee box intrude on your line of sight and eliminate any chance of hitting a comfortable right-to-left shot.
The obvious solution might seem to be aiming at the left side of the fairway—but that’s where trouble starts for the average golfer. The pine trees on the left are well within reach, and even if you don’t hit them directly, they can block your angle to the green.
The trick here is to tee up from the far left side of the box and take on the right half of the fairway. There’s plenty of room to work with—up until about the 280-yard mark.
The green is quirky in a good way. It slopes from front to back on the first half, then from back to front on the second half—kind of like a “grandma-approved” halfpipe. The entire complex also tilts slightly left to right, following the natural fall of the hillside. Because of this, hitting the middle of the green is your safest bet—it’ll leave you with an uphill putt no matter where the pin is.
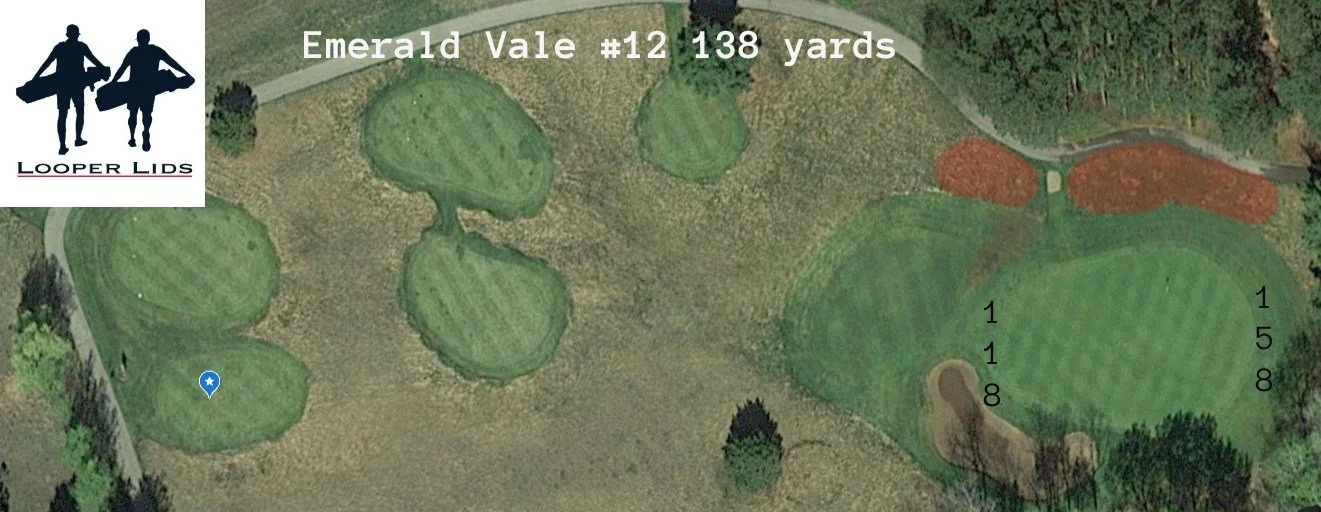
As a kid, this was my favorite hole for the longest time. It was one of the few par 3s I could actually reach with my 16° kids driver. At 138 yards and playing over 30 feet downhill, I didn’t even need to make perfect contact and my ball would still roll somewhere close to the green.
These days, driver is definitely too much club. Factoring in the downhill slope, the hole plays closer to 130 yards.
The green itself is massive—about 40 yards deep—so getting an accurate number is key. Otherwise, you might find yourself facing a 100-foot putt off what felt like a solid swing.
Visually, the right bunker looks like trouble, but I’d take that lie any day over missing left. The left side can be a real hazard depending on the season: sometimes it’s under water, and other times it’s covered in the thickest grass on the course.
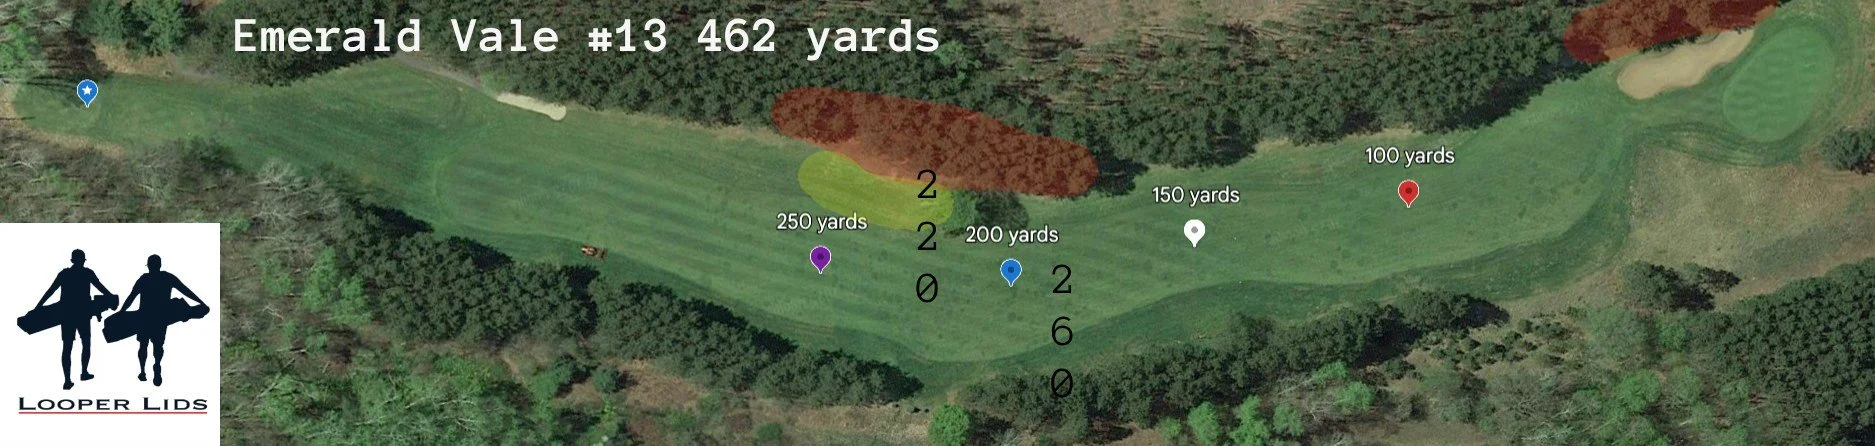
The 13th is one of my favorite holes at Emerald Vale. This short, dogleg-left par 5 is all about risk-reward decisions—and your ability to recover if things don’t go your way.
The hole bends around a massive tree located about 220 yards from the tee box. To challenge it, you’ll need to carry the ball at least 250 yards. If you can pull it off, you’ll have less than 200 yards into a very reachable green. But be warned: trees line both sides of the fairway, and if you miss your line, you're basically playing plinko through the woods.
I still remember a round where I thought I’d hit a perfect drive over that big tree. At the last second, it clipped one of the final branches and kicked hard left. I found my ball nestled right against a trunk—no swing possible. In a frustrated moment of genius (or madness), I attempted a bank shot off the tree to get back in play. It actually worked—but I didn’t move fast enough and the ball clipped me. Fun fact: that’s a penalty. Fortunately, it was match play. I just forfeited the hole... and had a bruise on my hip for a week.
For most golfers, the smart play is to hit something around 200 yards to the right of the big tree. That’ll land you in the widest part of the fairway with about 250 yards to the pin. Since the fairway ends about 210 yards out from there, just hit something less than 200 on your second shot and you’ll be left with a comfortable wedge into the green.
The green itself is friendly—sloping left to right off the backside of the left bunker and tilting gently back to front. It's very receptive to incoming shots, so don’t feel pressure to be perfect with your approach.
I can’t stress this enough: keep it in play and this hole becomes very gettable. I once had such a rough go on this hole that I walked back and replayed it out of spite—8-iron off the tee, 8-iron for my second, and a 9-iron into the green. Simple as that. Stay out of the trees and good things will happen.
I think the next time I play this hole, I’m just going to close my eyes, reach into my bag, and pull out a random club to tee off with.
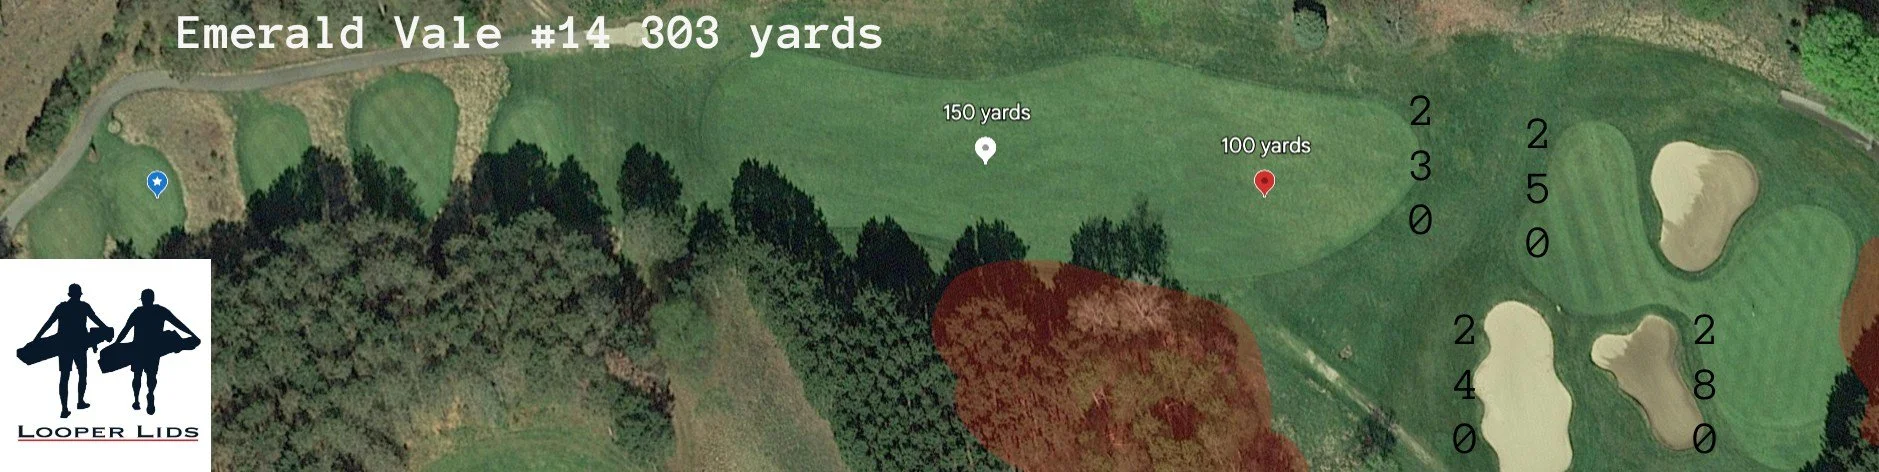
Normally, when I do all the background work for these blog posts, the best strategy on each hole becomes pretty clear. But the 14th at Emerald Vale? It's here to test your patience—and your decision-making—for eternity. No matter how many times I play it, I still can’t settle on the “right” way to attack it.
The smart play is straightforward: hit something around 200 yards and leave yourself a comfortable 100-yard wedge into a pretty receptive green.
But where’s the fun in that?
My subconscious screams at me to go for more... and yet, I know it’s probably not worth the risk.
Okay, enough about my internal chaos—let’s break down the hole. The 14th is a short par 4, only 300 yards, but don’t let that fool you. It’s guarded by bunkers short of the green and framed by trouble on both sides. The tee box sits 44 feet above the green, and the fairway is at its widest about 180 yards out. From there, it narrows until it ends completely at 230 yards. Trees line both sides, and trust me—neither side offers much of a recovery option.
So really, it boils down to a simple choice: do you go for the green and hope to thread the needle? Or do you take the “boring”—I mean, smart—approach and hit something under 200 down the pipe?
The green itself is friendly enough, sloping back to front with no major tricks. It's gettable—as long as you give yourself a decent look.
I’d love to hear what other golfers choose on this one and how it works out. Y’all know where I stand… or at least how conflicted I am about it.

After all the indecision on the 14th, the 15th feels like a breath of fresh air. From a strategy standpoint, it’s about as straightforward as it gets. This short-ish par 4 continues the familiar theme: stay out of the trees, and good things will follow.
A slightly elevated tee gives you a clear view of the hole—an uphill climb to the green and a fairway bunker on the right at around 250 yards. That bunker marks the boundary. Stay short of it, and the landing zone opens up as wide as it gets. I usually go with my 230-yard club off the tee to take the trouble out of play.
The green is elevated and slopes from the back-left corner to the front-right. If you're going to miss on your approach, miss left—you’ll have a downhill chip, but it’s much better than missing short or right. The front-right bunker is deep and, in my opinion, one of the toughest on the course to escape from cleanly.

I love being able to see actual numbers behind how I remember a course’s topography. Usually, my memory holds up pretty well at Emerald Vale—but this hole kind of blew my mind. I had to triple-check my math when I saw that this hole ascends 48 feet from tee to green. I always knew it was uphill, but nearly 50 feet? That surprised me.
It does explain a lot, though. Despite this being just over 500 yards—a distance I can cover with two well-struck shots—I honestly don’t remember ever reaching this green in two.
The 16th is dead straight, flanked by long grass on both sides, and plays like an uphill death march. You can’t see the green from the tee thanks to a large hill that begins 225 yards out and climbs 18 feet, peaking around the 150-yard marker. Anything further back than 180 yards and your view of the green is completely blocked.
If your view is obstructed, use the pine trees behind the green to help line up your shot. The left edge of the middle pine tree marks the center of the green.
From both the 150- and 100-yard markers, the green rises another 15 feet, so make sure to add about 5 yards to your approach to compensate. The green slopes steeply from back to front—so you definitely don’t want to go long. But the front bunkers are no joke either; they’re deep and demanding.
A good rule of thumb here: shoot for the back edge of the green and play to that number. Factoring in the uphill, this approach gives you the best odds of actually holding the putting surface.
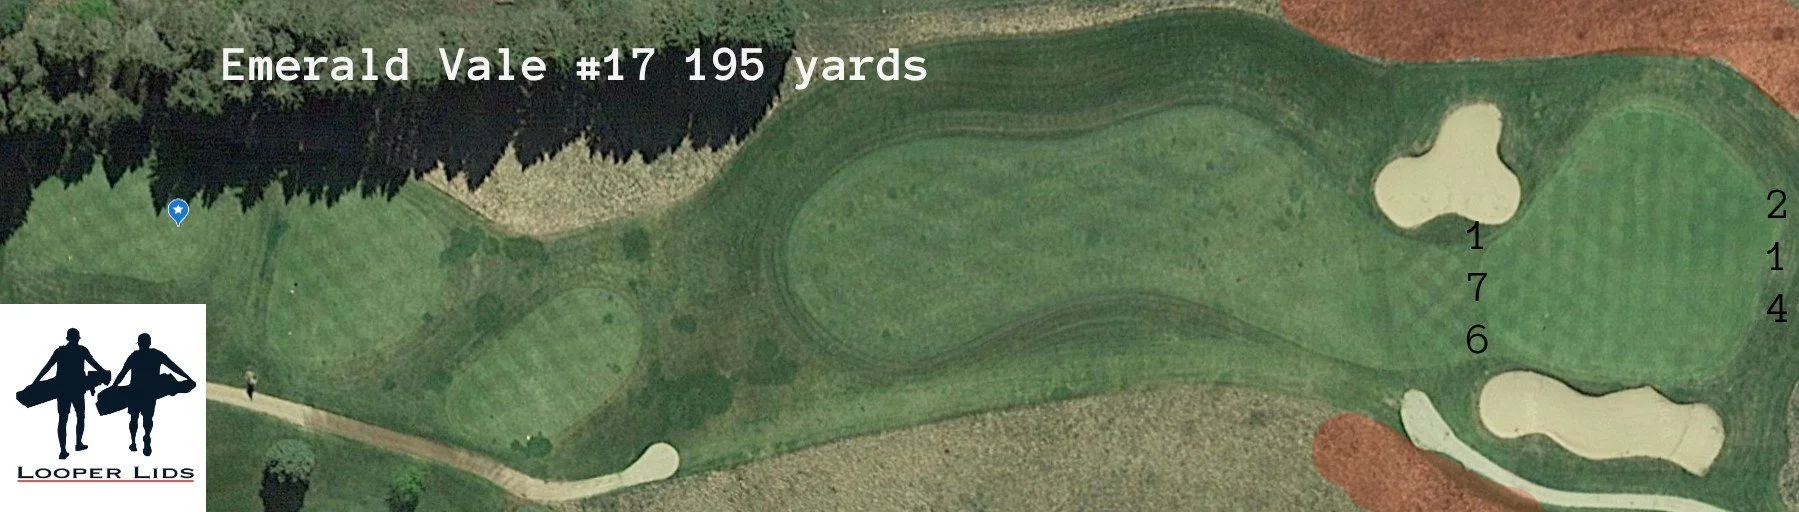
The downhill 17th is one of those par 3s that shouldn't be too tough—but at this distance, even solid ball-strikers can see some wide shot dispersions.
The front edge of the green is about 175 yards from the blue tees, which is typically the number I try to carry. With nearly 30 feet of downhill elevation, that 175 shot will often carry closer to 185 yards. That puts your landing zone right on the front half of the green, with plenty of room for the ball to release forward.
However, this hole often plays into a hurting wind from the right, which can completely neutralize the effect of the downhill. Club selection here gets tricky, fast.
The green is one of the largest on the course and isn't overly dramatic—there are plenty of subtle breaks, but nothing consistently severe or intimidating.
As for misses, the worst spot is definitely right of the right-side bunker. That area is often beat up from cart traffic, and the long grass slopes down toward the green, leaving you with a downhill lie and a carry over the bunker. It’s a tough spot to recover from—definitely a shot you want to avoid.
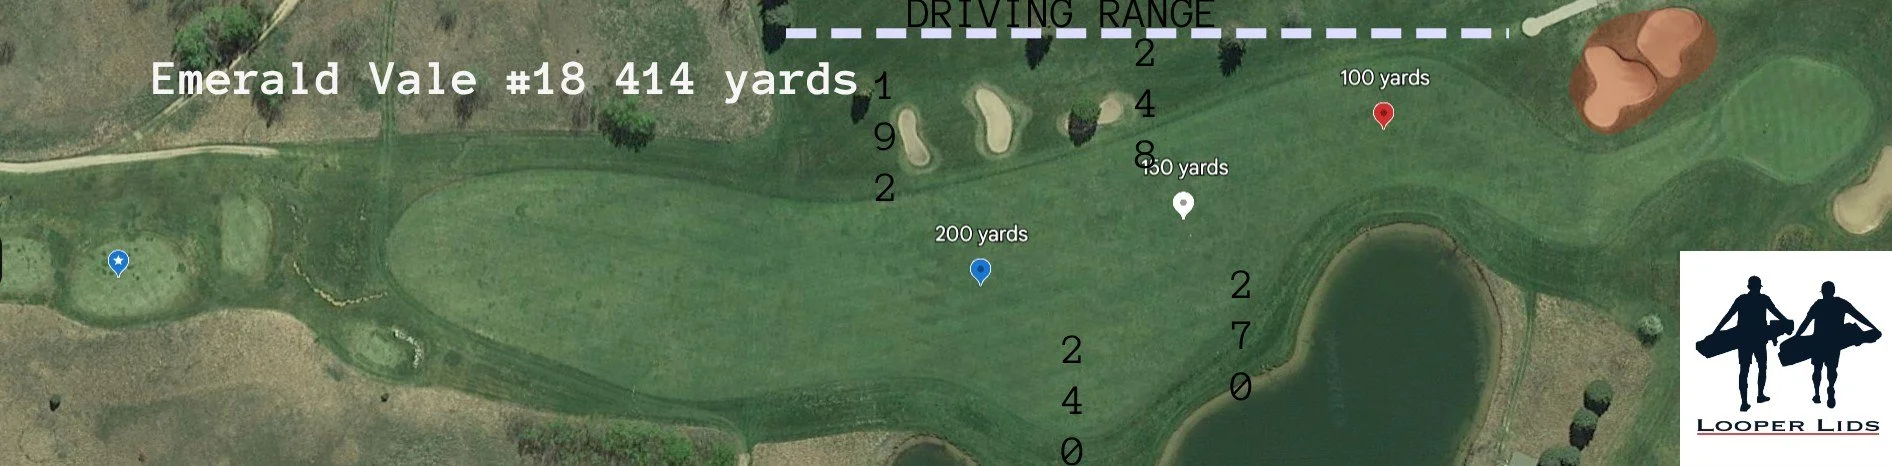
The finishing hole at Emerald Vale is a solid test to close out your round. It’s the second-longest par 4 on the course and plays uphill from tee to green, with plenty of visual trouble to get in your head off the tee.
Water begins creeping into the fairway starting about 240 yards from the blue tees. Fortunately, the fairway is at its widest right here—about 70 yards across. But as you move further up, the water keeps pushing in. By the time you're 270 yards out, the fairway narrows to just 42 yards wide.
This visual pressure might tempt you to bail out left, but that’s not a great option either. There are small pot bunkers on the left side of the fairway, sitting between 192 and 248 yards from the tee. A few steps left of those bunkers, and you’re technically out of bounds—but it isn’t a property line, just the driving range.
I say “technically” because, well... let’s just say I’ve “found” my ball over there and played on, though the white stakes didn’t exactly approve. You’ll have a shot at the green—just maybe not a clean conscience.
Personally, I hit driver and aim at the left edge of the water. It's the bold line, but with a confident swing, it sets you up well.
The approach plays slightly uphill and, like 17, usually into a hurting wind. The safe miss here is long—so take plenty of club and commit to the shot. Coming up short can bring nasty bunkers into play.
CONCLUSION:
I don’t play Emerald Vale nearly as much as I used to, but I’m still a big fan of the place. With the most expensive rate topping out at $60 for a weekend round with a cart, it’s one of the more budget-friendly golf experiences out there. Want to get some steps in? You can walk it for just $26. You just don’t find value like that for golf in Northern Michigan anymore.
Is Emerald Vale going to have the best conditions you’ll find? No—but what it does offer is 18 unique, well-designed, and genuinely challenging golf holes. At the time I’m writing this, the course is up for sale. I can only hope the future owners see its potential and invest in it. If they do, I truly believe this could be one of the top tracks in Northern Michigan.
Thanks for following along—and go check out Emerald Vale!
—Your Hat Caddies