
Course Breakdown: The Bear
The Bear has earned a reputation as one of the toughest golf courses in Michigan—and in the U.S. in general. Once ranked among the top 20 hardest courses in the country, I've noticed a trend of the course being toned down for public play. For my fellow golf architecture nerds, you’ll know that the designer, Jack Nicklaus, is notorious for creating brutally challenging tracks—almost to the point of punishing the average golfer for not being world-class.
All things considered, if I had to choose between The Bear and its less-premier sister course, The Wolverine, I’m playing The Wolverine 9 out of 10 times. It’s just more fun—and that’s where I find the most enjoyment when I play golf. Maybe that says more about me than the courses, but prepare yourself to get your ass kicked from the first tee shot to your final putt on 18.
The good news? You care enough about how you play to be reading this course breakdown. That means the fate of your success is now in my hands—and boy, oh boy, does that get me all giddy.
This breakdown is from the 6,600-yard blue tees. Stay out of the long grass, and let’s do our best not to short-side ourselves around the greens. One thing I love about The Bear is that it sticks to rotating pin locations. On the scorecard, each green is divided into four distinct areas where a pin can be placed. If it's a “1” day, all of the pins will be in the “1” area for that round. This makes determining pin locations easier and can help you choose the right places to miss.
Let’s dive in!

#1
The first hole is a well-mannered par 4 with plenty of room to ease you into your round. I prefer to challenge the left side of the fairway rather than the right because of the angle into the green complex. The greens at The Bear are fairly small, and working the right angles is key to scoring well.
The left fairway bunker is 237 yards to carry and, in my opinion, worth the risk to gain that preferred approach angle. The right side of the fairway dips down a foot or two and tends to be lush and soft. Jack Nicklaus loves using mounding to create uneven lies and punish players who miss the fairway—and the right side here is full of them. If you’re into a little Russian Roulette with your lies, you’ll feel right at home.
The green complex is narrow at the front and widens toward the back. It slopes from the back-right corner down to the front-left, so whatever you do, don’t go long. I'd much rather be short in the bunkers than long in the rough with no angle.
If the pin is in the front section, don’t be afraid to just aim for the fat part of the green. I’ve seen decent golfers ping-pong back and forth between the bunkers that sandwich this front section—and I’d hate for that to happen to you.

#2
The 2nd hole is one of the best out at The Bear. From the blue tees, it’s listed at 410 yards, but it plays significantly longer thanks to a steady 25-foot climb from tee to green. It’s a proper wake-up call and will definitely put some hair on your chest.
The tee shot is blind, which always adds a little drama, but don’t worry—you’ve got more room than it looks. Aim between the two clusters of trees; there’s plenty of space until about 255 yards. With the uphill grade, I’d say unless you’re routinely hitting your driver 280+, you’re safe to swing away.
The fairway essentially ends at that 255-yard mark, and from there the hole wraps around a low area of rough leading up to the green.
The green itself is wide but narrow front-to-back, so distance control is the name of the game. Generally speaking, you never want to miss long on a Jack Nicklaus-designed course—but this hole is the exception. Long is better than short. The front-left bunker is deep—like, bring your sand wedge and a prayer deep—so steer clear. Putting back from long is a far better fate than trying to escape from below green level.

#3
The 3rd is a beautiful downhill dogleg right and can definitely be one of the easier holes on the course. With the prevailing wind at your back and a wide fairway staring you down, this hole just begs you to let one rip. Stay left of the big maple on the right and pick a bunker to aim at—trust your line and swing confidently. With the downhill slope and helping wind, expect big things and don’t be afraid to take an aggressive line.
The fairway begins to pinch inside the 200-yard marker as you enter a narrow chute of hardwood trees. If your drive is offline, you’ll be forced to shape your next shot to thread through that gap—so the reward for a well-placed tee ball is real.
A solid drive gives you a legit chance to reach this green in two. If you’re going for it, your miss is short right. Just make sure you clear the creek—short is fine, long is not. If you have to lay up, I recommend leaving yourself at least a ¾ wedge—about 80 yards for me. A creek runs across the fairway roughly 50 yards short of the green, and if the pin is tucked behind the left bunker, you’ll want a shot that can land soft and hold.
The green slopes from the back-left to the front-right, so you really don’t want to miss long. That’ll leave you with a downhill chip to a green that runs away from you. Touchy stuff. A couple of decent swings should set up a good look at birdie on this one.

#4
I remember a high school tournament on this hole where I made a very respectable 8. Now, that might not sound logical—until I tell you I failed to carry the hazard that butts right up against the green three times. I finally hit the green on my fourth attempt and drained the putt. See? Pretty respectable 8.
There may not be water in the hazard short of the green, but it might as well be lava—because if your ball goes in there, it’s gone forever. You have to miss long on this 150-yard par 3. It’s not a long hole, but I respect the hell out of it, and I’ve promised myself I’ll never make 8 on it again. (Unless, of course, good ol' human error shows up.)
This hole is especially tricky for right-handed players. Honestly, it reminds me a bit of the 12th at Augusta National. Take a look at the overhead: the front-left portion of the green is about 140 yards to carry, while the front-right is closer to 155. That angle mirrors Augusta’s 12th almost exactly. For a righty aiming for the middle, a slight pull will send the ball long and left, while a push lands short—right in the hazard. That’s a good way to end up with a 7. Just saying.
My advice? Take your medicine and miss long on this dicey little par 3. You’ll thank yourself later.

#5
I’m not sure if this is always a Jack Nicklaus thing, but there are a bunch of upcoming holes where the fairway just ends and forces you to lay back. This one’s fairway cuts off at around 255 yards—but with an 18-foot drop from the tee to the fairway, it plays even shorter than that. More often than not, you’ll have a helping wind, so you probably can’t hit more than your 230 club without flirting with the water hazard.
And don’t even think about missing left—there’s a creek that runs along that side until it feeds into the main hazard. It’s pretty, sure—but it can ruin your round real quick. My kind of lady.
A perfect tee shot leaves you just under 150 yards into a two-tiered green. The bottom tier is relatively tame, but the back tier? Much tighter, and surrounded by moguls. I think I called these “mounds” back on Hole 1—but hey, tomato-tomahto(?). Anyway, moguls, mounds—same deal. They're annoying.
Unless you're feeling particularly frisky, it's best to play to the front half of the green and avoid going at the back pins. That upper tier is no joke.

#6
Long and uphill, the par 5 6th is a three-shot hole for most of us mere mortals. With that in mind, don’t be afraid to favor the right half of the fairway off the tee. The only real trouble is some thick rough up the right side, but it’s 280 yards out—so unless you’re a bomber, you’re probably safe.
The hole slopes from right to left the whole way, so keep in mind that shots from this uneven lie might drift a little further left than you planned. Be smart with your setup and aim point.
For the layup, I like to leave myself somewhere between 100 and 75 yards out. This is the fattest part of the fairway—nearly twice as wide as it is inside 50 yards. Staying in the fairway is absolutely crucial at The Bear, so I’d say that’s pretty damn good advice.
The green complex is deceptively flat, but everything around it still slopes right to left. That means a miss left leaves you with an uphill chip, which is the better miss in most situations.

#7
The 7th hole at least gives you the option to take a shortcut, instead of forcing a layup—but unfortunately, for me, it’s still a layup hole. The good news? It’s a shorter par 4, so even with a conservative 220-yard tee shot, I’m still left with a short iron into the green.
For the bombers out there, you can reach the left fairway if you can carry it 255 yards. I’m not sure it’s worth it, since that fairway is nearly half the size of the main one—but hey, it’s always good to have options.
Now, the green complex here might be my favorite on the entire course. The left and back sections are elevated, while the bottom right corner sits about two feet lower, creating some really fun and challenging pin placements. That said—do not miss in the left greenside bunker. It's a brutal up-and-down to just about any pin location. If you’re playing for a left pin, I could see the argument for trying to hit that upper fairway. For any other pin, though, I’d lay back, play smart, and avoid the heroics. If you are visiting The Bear on a pin placement 1 day, you cannot miss long or left. You are better off short of the green than putting from beyond the hole.
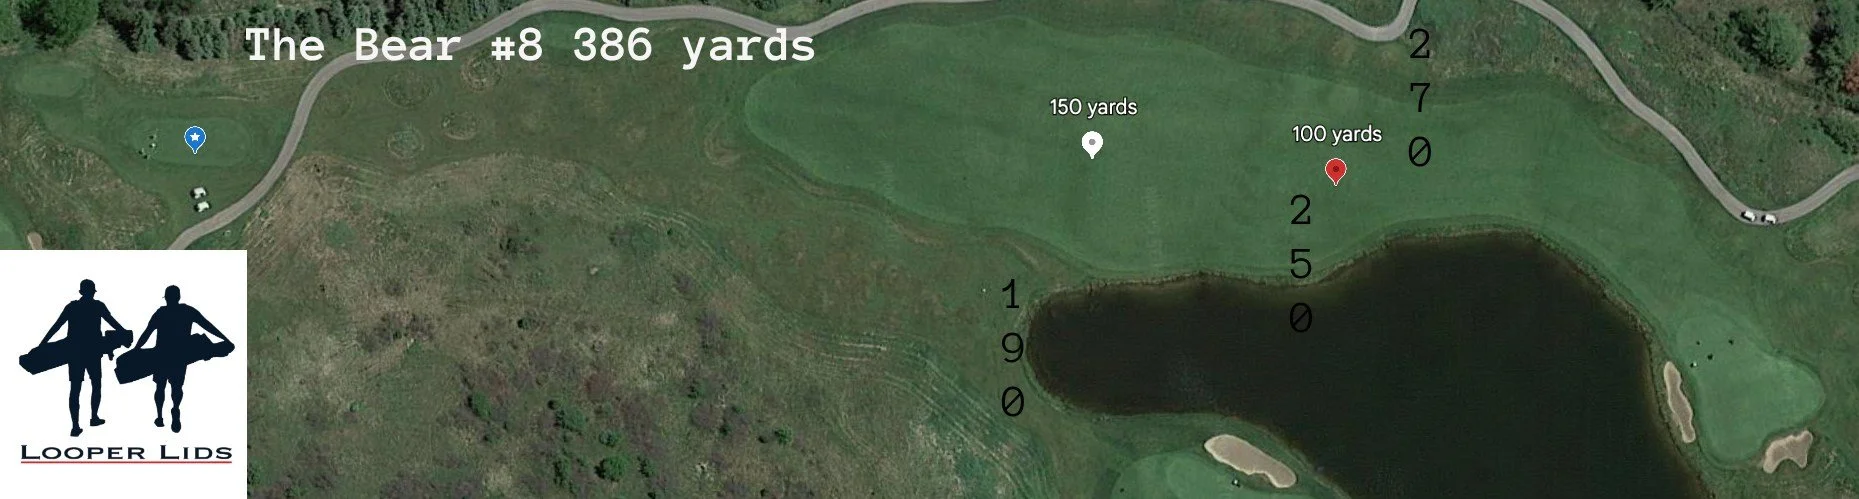
#8
The 8th is a solid par 4 that will definitely intimidate you into aiming further left than you really need to. I swear, whoever sets the tee boxes has purposely aimed them just slightly to the right, so you’re left staring at that massive lake off the right side of the fairway. But once you get past that initial intimidation, you’ll realize the hole actually offers a pretty wide fairway—at least until about 250 yards. After that, the water starts to creep in and the fairway narrows considerably.
If you’re aiming left, you’ve got room until about 270 yards, but then the rough and mounds start to take over. With all that in mind, I usually hit my 250-yard club off the tee and aim for the left half of the fairway.
The green complex slopes from left to right, and I can’t think of a single time I’ve played The Bear where the wind wasn’t hurting on the approach shot. Long is a miss, but trust me—it's still better than coming up short and splashing it into the water.
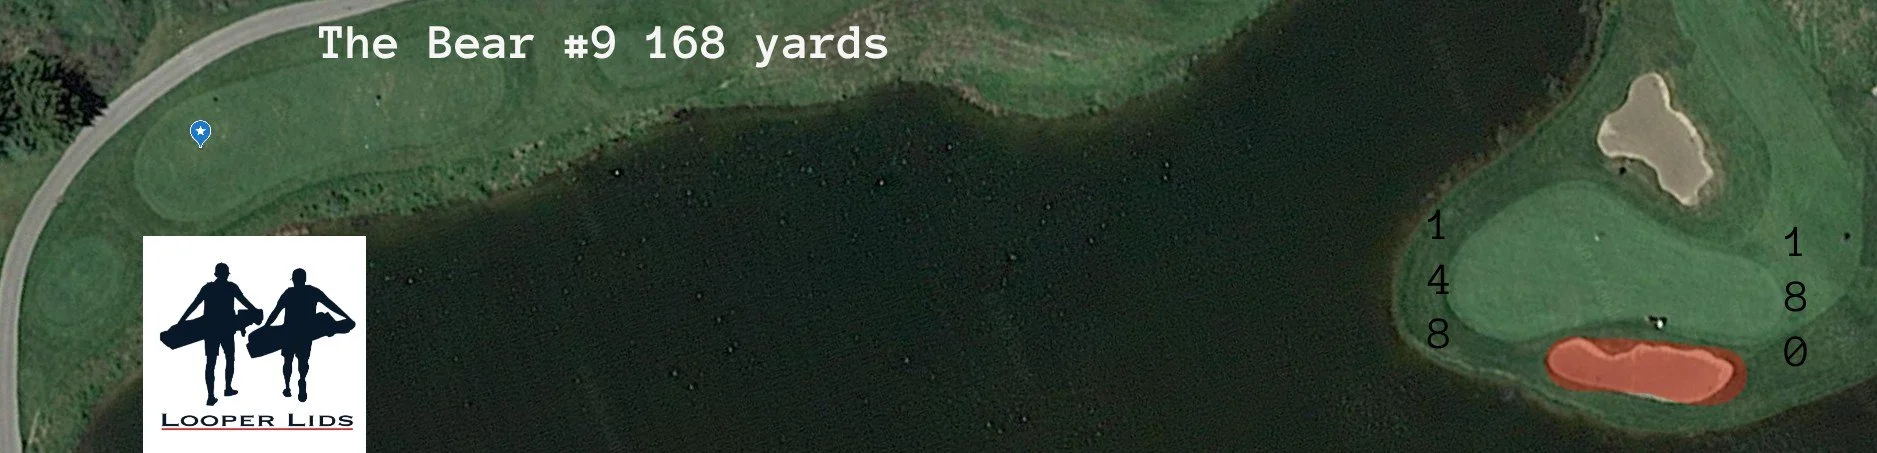
#9
Since we’re talking intimidation, let’s dive into Michigan’s version of an island green—or as we like to call it, a peninsula. That’s right, water surrounds this green on three out of four sides. The green itself is long and narrow, a little fatter in the front, and then squeezed by two bunkers.
On the overhead, I marked the right bunker as the spot not to miss—but honestly, I should’ve marked both. You cannot miss it in the short-side bunker. I’ve seen way too many thinned wedges that end up in the water on this hole.
This hole is usually downwind, so my strategy is simple: figure out how far I need to carry it and play to that number. I’m aiming for the front half of the green and would happily walk off with a two-putt par and get the hell out of there.
If the pin is in the back half of the green, long is a decent miss. Once we get past this hole, I feel like the course eases up a bit. Don’t you feel better knowing there’s light at the end of this tunnel we call The Bear?

#10
The 10th is a friendlier way to start the back nine at The Bear. At just over 500 yards and playing a whopping one foot uphill, a few decent swings should give you a look at birdie. The main defense of this hole is the Florida-shaped green. No, it isn’t a perfect representation—but if you squint just right, I’m hoping you see it too.
Off the tee, you're looking at a good-sized fairway that tilts slightly left to right, with a bunker on the left coming into play at 250 yards. If you’re not worried about reaching this bunker, I’d say it should be your target. If the bunker is in play, you'll have to challenge the right side, which requires carrying rough that ranges from 220 to 250 yards, depending on your angle. You don’t want to miss right here—this is mogul city until the 250-yard mark, where it transitions into a hazard area.
A creek runs across the fairway between 100 and 120 yards from the hole and forces you to make a decision. From the 300-yard mark, you’ll need to either hit a 170-yard shot (or less) to stay short of the creek, or a shot that carries 200+ yards to clear it. I’d like to think I’m going for it more often than not, but a bad drive can quickly change that plan.
The Florida-shaped green is one of the smallest on the course and is squeezed between four bunkers. The pin location should heavily influence your strategy. A back or middle pin is more forgiving and allows you to come in from nearly any angle. But if the pin is in the front-right section (South Florida), you simply cannot be pin high or long. I’d try to leave myself a shot in the 50-yard range for that pin placement.

#11
The 11th hole at The Bear continues the trend of a forced layup, making this ~360-yard hole play longer than it looks on the card. Here, the fairway cuts off at 245 yards and resumes again at 260 yards. Personally, my best drives can carry the hazard—but there's a 0% chance I’ll hit driver on this hole. I’ll hit my 230 club and be left with some sort of short iron.
The left side of the fairway gives you a much better angle compared to the right, but this is one of the few holes where you’ve actually got a decent chance of getting up and down from around the green.
That said, your preferred miss is short and left—if you can help it.
The green complex tilts slightly left to right, and if the pin is in the back-right corner, play it safe and aim for the middle of the green. This section is the most dramatic, and leaving yourself short-sided here could be the dynamite that blows up your round.

#12
When someone mentions The Bear, this is one of the first holes that comes to mind. This downhill par 4 starts off wide open but begins to pinch in with hardwoods around the 200-yard mark. At that point, the fairway is still relatively wide at 37 yards, but it continues to narrow as you move forward, eventually reaching a water hazard at 270 yards—where the fairway tightens to just 20 yards wide. This hole screams risk-reward in the best way possible.
Because the approach shot is entirely over water, golfers often get overly aggressive off the tee in hopes of setting up an easier second shot.
You definitely don’t want to miss into the left hardwoods. From there, you're looking at a terrible angle, and hitting a single leaf could be enough to knock your shot down into the water. This hole is designed for a left-to-right tee shot, using the space behind the right trees that opens up a clean look at the green.
Like so many other holes at The Bear, I’ll be hitting my 230 club and accepting a longer shot over water, even if it's not the ideal distance.
On your approach, avoid missing left again. A downhill chip from the trees onto a green sloping away from you—and toward the water—is not a recipe for success. This hole may not be long, but trouble lurks around every corner. Tread lightly!
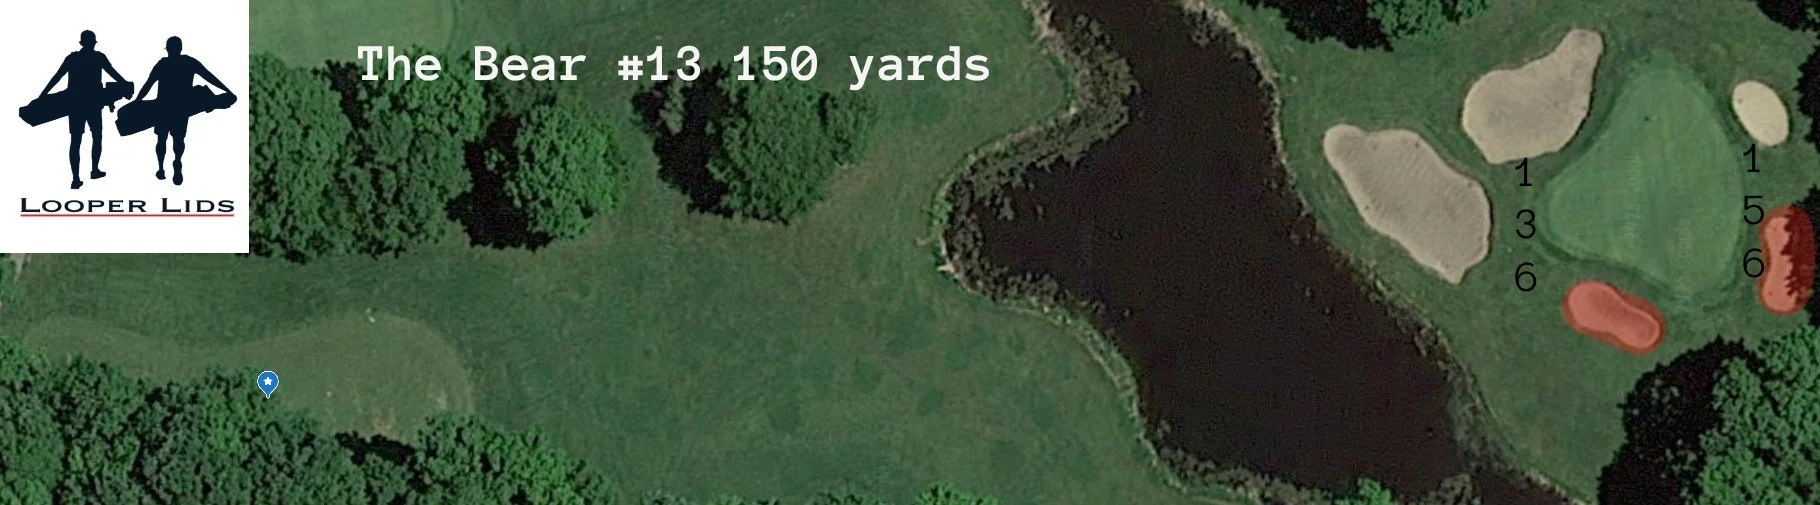
#13
The 13th has got to be one of the coolest spots on the entire golf course. From the tee, you can do a full 360 and all you'll see are 100+ year-old hardwoods, with the green perched up about 150 yards ahead. If you're a shy urinator, this hole is your salvation.
This triangle-shaped green starts off very skinny and gets wider and wider as you move toward the back. It slopes from the back-right corner to the front-left—and if you’ve been reading these breakdowns, you should know what that means.
—pause for dramatic effect—
That’s right: don’t miss right! Especially not long and right into the back bunker—yikes.
One thing to note is that the prevailing wind tends to be into you. But because the hole is so enclosed, the wind shouldn’t affect the ball too much unless you’re hitting it above the tree line. Not an issue for most, but if you're reading this before playing in the Michigan AM, consider that your insider tip.
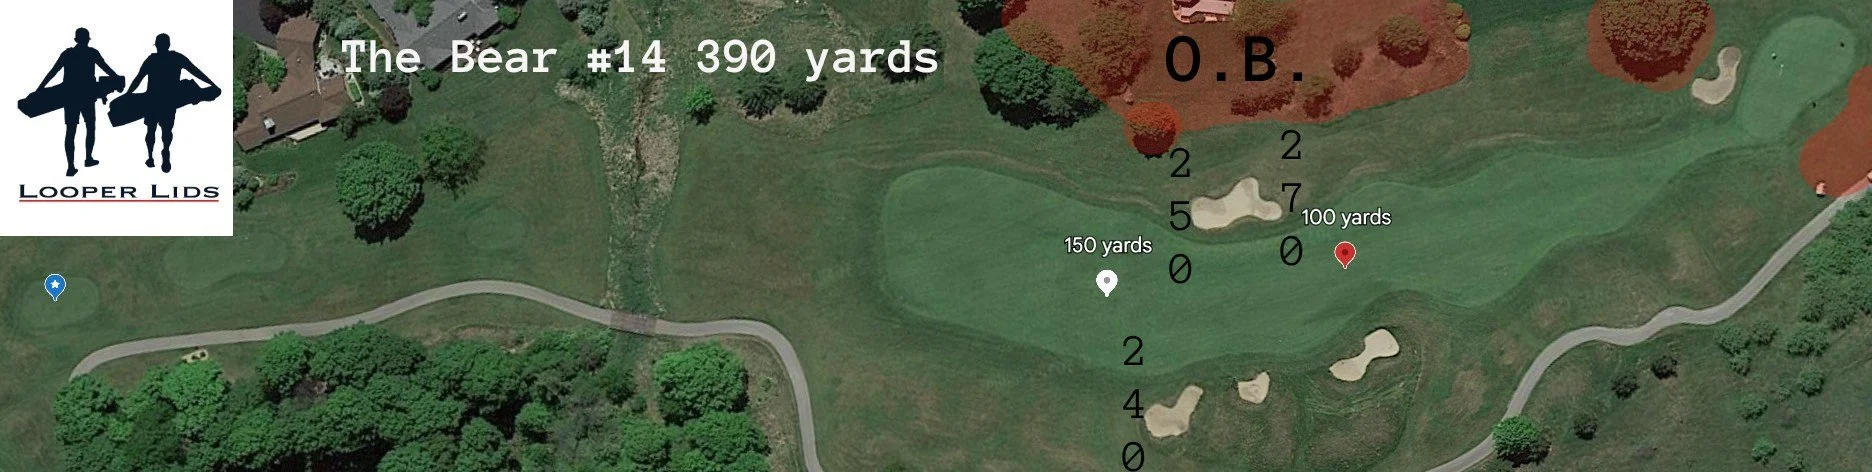
#14
The tee shot on the 14th is one of the most uncomfortable on the entire golf course. The giant hardwoods surrounding the prior par 3 enclose the right side of the hole, while out of bounds (OB) quickly comes into play on the left. With overhanging branches to the right, this tee shot simply gives me the heebie-jeebies.
One strategy to combat this is to tee your ball up from the far left side of the teeing area. For my righties out there: only your ball needs to be within the teeing area—you can stand outside of it to position yourself as far left as possible.
If you feel confident hitting a left-to-right shot, I think driver is fine. But if that’s not your preference, use a club that stays short of the 250-yard bunker on the left.
On your approach shot, remember to add yardage for the uphill slope and prevailing headwind. From 100 yards out, add 4 yards; from 150 yards, add 6. Be especially careful of the left greenside tree—it loves to swat balls that land just left of the green, often leaving you in a horrendous position to get up and down. The right side is the smart miss on this approach.
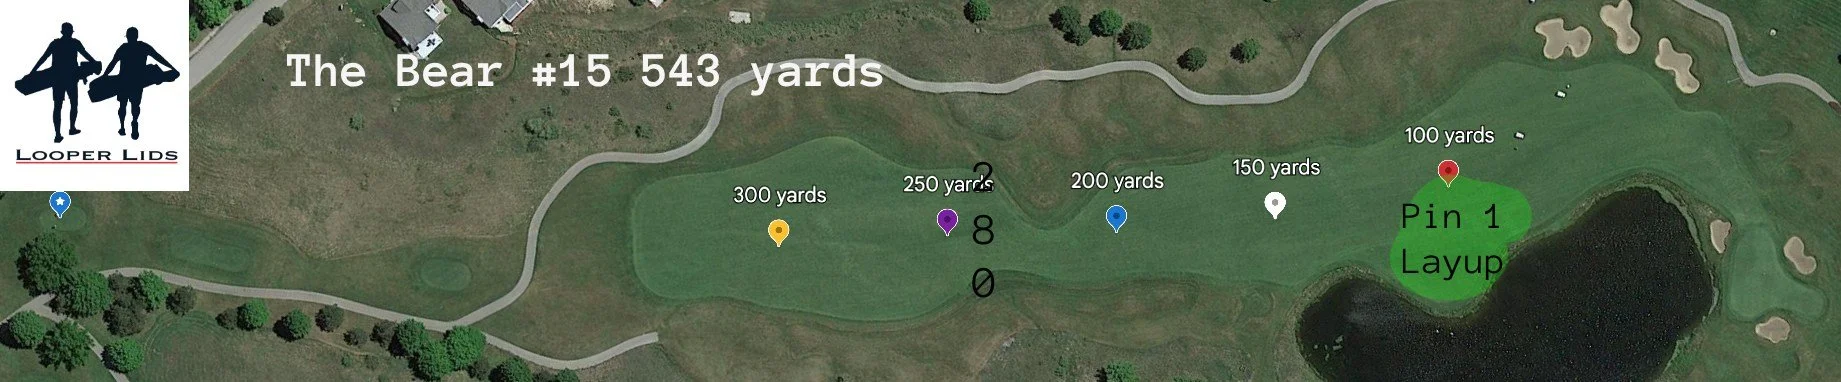
#15
The downhill par-5 15th is big, bold, and I love it. A 60-yard-wide fairway starts generously but begins to tighten as you progress, really pinching past the 280-yard mark. By 300 yards, it narrows to just 12 yards. From what I’ve seen, most tee shots that carry beyond 280 yards don’t stay in the fairway, adding serious adversity for those attempting to reach the green in two. Factor in the forced carry over the water hazard separating the fairway and green, and this becomes a make-or-break shot in your round.
There’s a huge section of fairway to the left that doglegs around the lake, but the farther left you go, the worse your angle into most pin positions becomes. The best place to lay up is the green-marked area on the right side of the fairway. This spot offers an ideal angle into the green complex—especially true when the pin is in position 1.
To play devil’s advocate: while the angle from the left side isn’t great, it does eliminate the need to carry the water. This is where you need to assess your own abilities and decide what’s more important—having the perfect angle to go pin-seeking, or avoiding the risk of a splash and the dreaded walk of shame back to your bag for another ball.
Missing the green on this hole is extremely punishing. Anything long leaves you a dreaded downhill chip off a downhill lie. This is a better miss than short in the water but know you have to be careful.
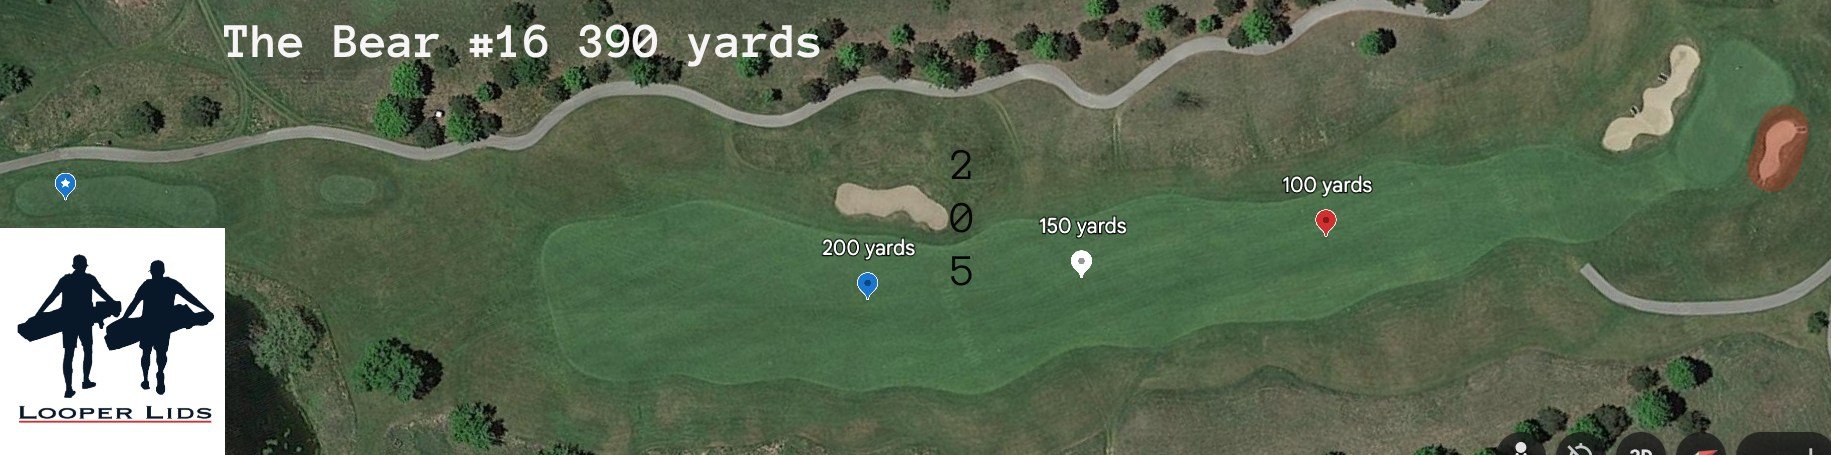
#16
The 390-yard par 4 doesn’t look too intimidating on the scorecard, but the 30-foot climb from tee box to green adds some serious hidden length. Off the tee, your only real obstacle is a bunker on the left, which is 205 yards to carry—but plays closer to 220 with the uphill elevation, so keep that in mind when picking your aim point.
On your approach, add about 5 yards to account for the continued uphill. The green is perched and guarded by a deep bunker short-left. At first glance, that might seem like the worst miss—but I’d argue the right bunker is even more penal. From the left, you’re at least playing into an upslope. From the right, the green runs away from you and slopes down toward that same left bunker, making it easy to watch your next shot trickle away.
I know you don’t want to hear “just hit the green,” but in this case, I really mean it. It’s a tough hole, so if you’re between clubs, aim for the front-right section—it gives you the best chance to walk away with par.
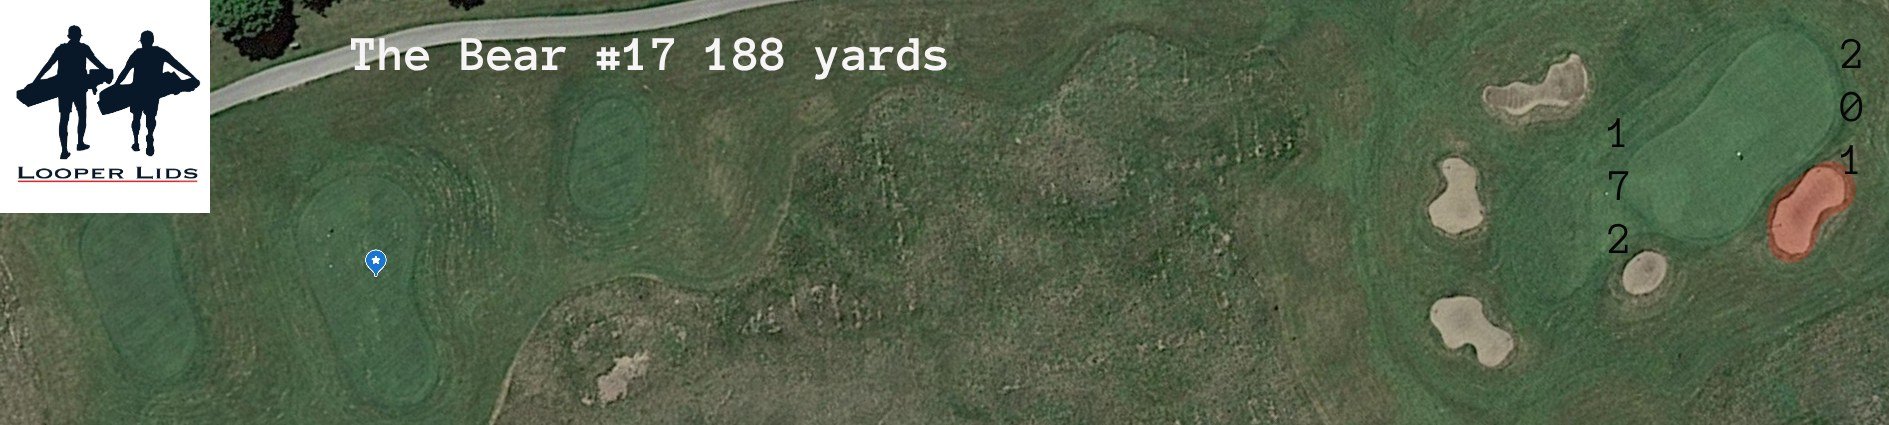
#17
After the gauntlet of the past three holes, the par-3 17th feels somewhat underwhelming. Honestly, it’s the one hole I remember the least on the entire course. At around 190 yards, it’s on the longer side, but it just doesn’t carry the same level of daunting challenge that the rest of the course seems to demand.
The main defense here is a pair of bunkers short and right of the green. Fortunately, long and left is a smart miss—it leaves you with an uphill chip to most pin positions, making recovery relatively manageable.
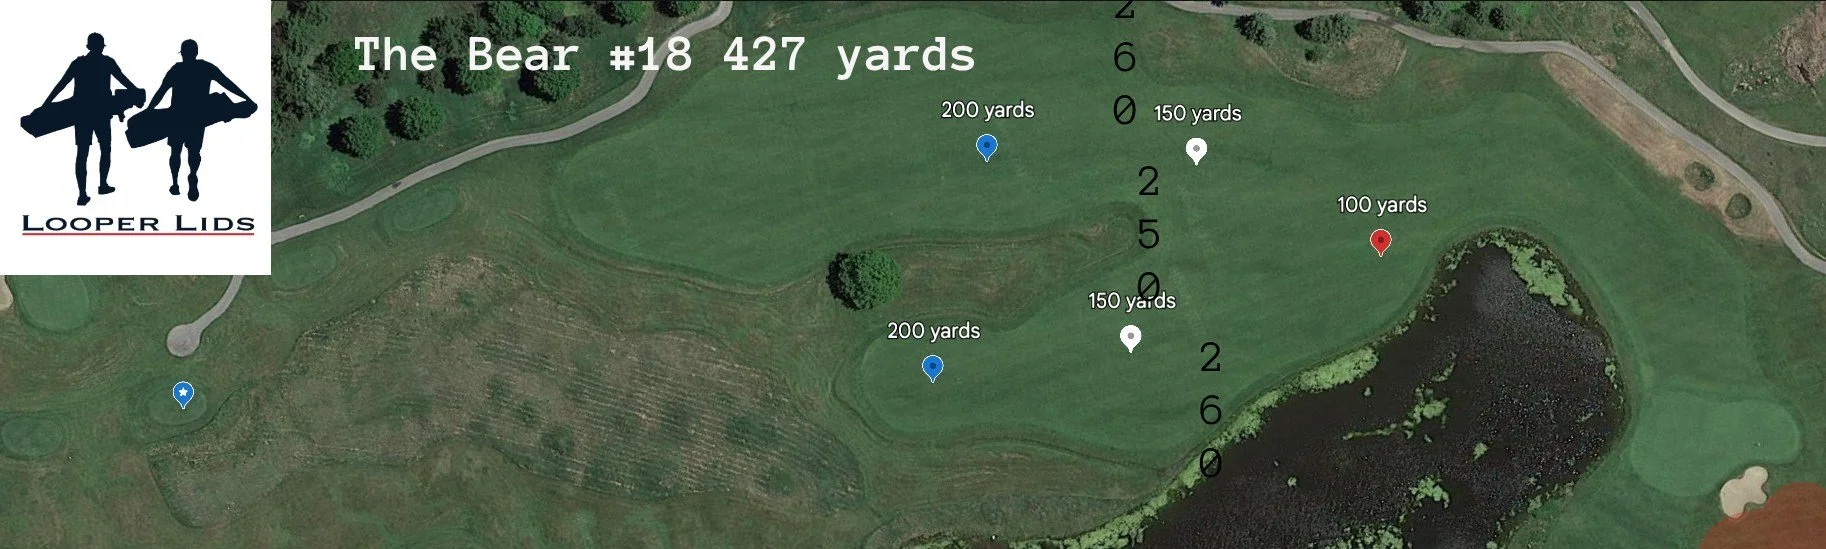
#18
If I have the audacity to call the 17th “underwhelming,” you know I’m about to do a full 180—because The Bear’s finishing hole is downright overwhelming. There’s a lot going on here—so much that I had to add multiple 200- and 150-yard markers to the overhead image just to make sense of both sides of this split fairway.
The fairway is divided by a strip of rough covered in moguls and anchored by a large maple tree, forcing most golfers to choose between the safer left side or the more aggressive right. The left side offers tons of room until about 260 yards, where it begins to tighten up. The right side starts narrow but widens until about 260 yards, where water starts to pinch in. The center rough extends to about 250 yards before merging back into fairway.
That’s a lot of detail, so here’s the skinny: if you’re not worried about your ball traveling 260+ yards, aim for the right fairway. While it may look smaller, it leaves a much shorter approach. A 220-yard drive down the left leaves you another 220 yards—all over water. A 220-yard drive down the right? You’ve only got 170 yards in—also over water, but from a much more manageable distance. So ask yourself: which do you prefer?
For those with the firepower to carry it 250+, aim directly over the maple tree. There’s wiggle room in both directions, and even if you don’t quite clear the rough at 250 yards, you’re still in decent shape.
The green is the largest on the course and slopes from the back-left corner toward the front edge. It’s full of humps and bumps, but your best chance at getting up and down is from short-left of the green.
Conclusion:
My conclusion on The Bear is pretty simple: this is a badass golf course. And honestly, I kind of regret something I said in my introduction—I claimed I’d rather play The Bear’s sister course, The Wolverine, 9 times out of 10. But just like your taste buds change over time, I think your preferences in golf courses can too.
It had been at least three years since I last played The Bear before heading back out there this spring. I played poorly—snap-hooked my driver all day (UGH). It was brutal. I got my ass kicked... and I appreciated every minute of it. The Bear is incredibly difficult, but I also believe it’s a fair test.
Would I want to play this course exclusively? Definitely not. But it’s a damn good golf course, and if you go in with tempered expectations, you’ll find something to admire—maybe even enjoy. At the end of the day, you wouldn’t win a fight against a bear in real life... and you’re not going to win this one either. My advice? Appreciate the ass beating.
Thanks for reading—and good luck out there!