
Course Breakdown: The Crown
The Crown Intro
When I think of Traverse City public golf courses, the first two that come to mind are Elmbrook and The Crown. Truth be told, these courses share a lot of similarities, and I’d be very interested to hear which of the two locals prefer. Personally, I’ve always leaned toward Elmbrook—but for reasons that don’t have much to do with the design or condition of the courses.
The Crown is a little more “proud” of their course, and it’s not the best option if you prefer to walk, since there are some long distances between holes as the layout weaves through a housing development. Before COVID, The Crown had a great locals’ special where you could play 18 holes with a cart for $35. I’ve been denied that deal a few times over the years, and I’ll have a hard time justifying the $105 peak-season rate (with cart) to play there this summer—especially when Elmbrook is still just $35 to walk.
This breakdown is based on the blue tees, which play around 6,200 yards. The spot I’ve measured from is marked by the blue tag with a star. The front nine is relatively straightforward, but the back nine features some very tricky golf holes. Be sure to check back as the full breakdown rolls out every Wednesday.
Let’s dive in!

Hole 1: A Friendly Start
The first is a relatively easy par 5 to get you warmed up—definitely Greg-approved. There's a bunker on the right that's 205 yards to reach and 230 to carry. On the left, a power line marks the boundary between in play and long, thick heather grass. You’d rather flirt with the bunker than mess with the left side.
With this hole playing just under 500 yards, a solid drive gives you a chance to reach the green in two. Shout out to Michael, who’s only played here once but went driver–4 hybrid to 8 feet and drained the putt for eagle.
If you’re going for the green, it's better to miss right than left. You really don’t want to end up in the cluster of bunkers short and left of the green.
If you're laying up, I’d suggest staying short of the right fairway bunker and leaving yourself a shot from 75–110 yards. From the 250-yard marker, that bunker is 186 yards to reach.
The green is guarded by two bunkers that pinch the left and right sides, effectively separating the front and back halves.
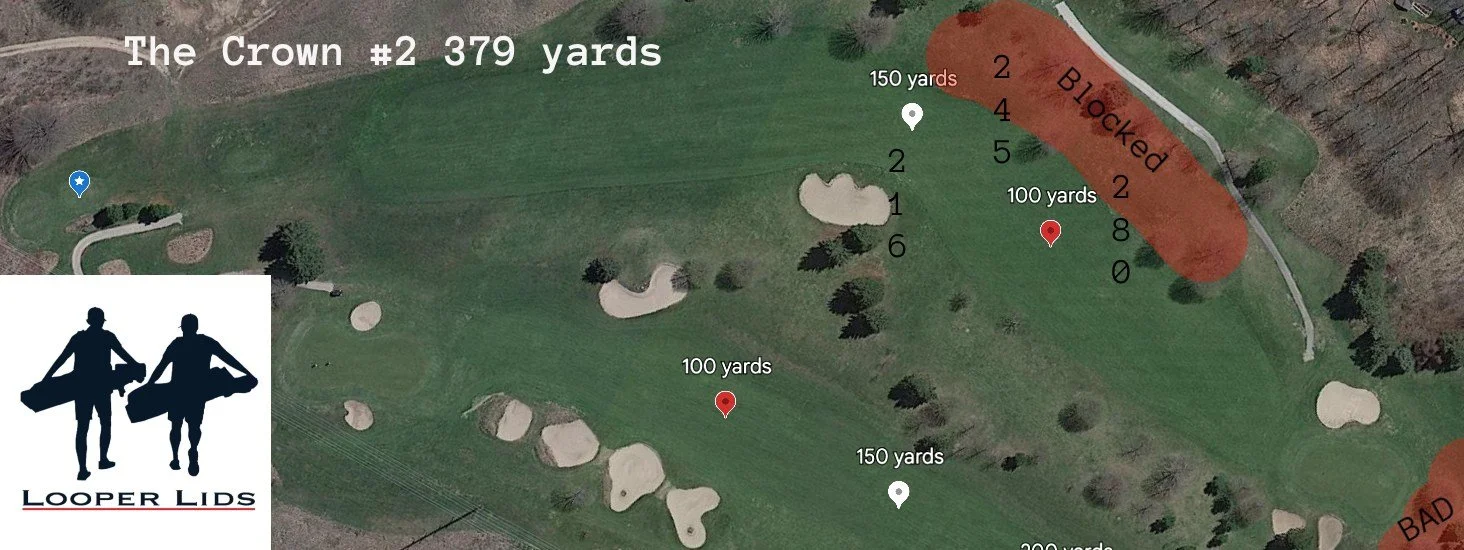
Hole 2: Dogleg Drama
You go from the dead-straight 1st hole to one of the most dramatic dogleg-right holes I’ve ever played. I’ve played holes that turn sharper, but this one forces you to shape your shot to fit the design, rather than just flying the ball over the dogleg. A few pine trees next to the tee box block your ability to take a more direct route.
Pro tip: Tee up on the far left side of the box to get the best possible angle.
Because of those pine trees, you have to make a decision on how to attack this hole. If you naturally hit a left-to-right shot, you can be more aggressive and try to cut the corner. But if that shape isn’t in your bag, your best bet is to hit a shorter club and avoid running through the fairway into the trees. A 230-yard shot just left of the bunker will leave you with ~150 yards or less.
On your approach shot, the worst place to miss is long. The terrain feeds away from the green and into the trees. Fortunately, the green is pretty flat, so any miss other than long gives you a solid chance to get up and down.
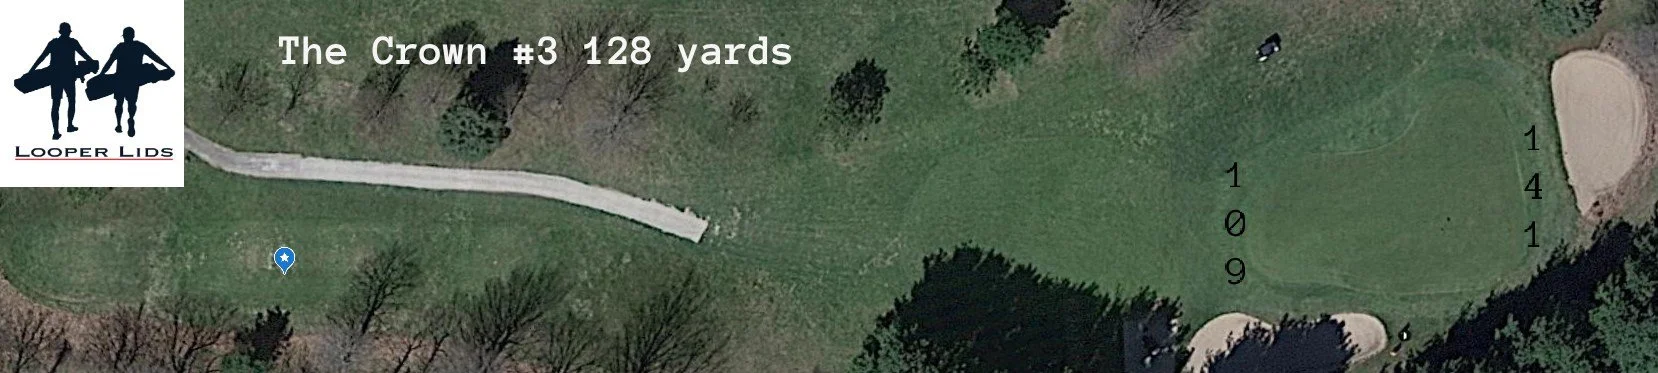
Hole 3: Short and Sweet
The 3rd is a great little par 3 that gives you a wedge or short iron into a pretty inviting green. The left side kicks down toward the green, but if you leave your approach up on that slope, you might be facing a testy downhill chip. Still, that’s a much better outcome than ending up in the right bunker—or worse, missing even further right.
The only tricky part of this tee shot is the wind. It's usually downwind, but you might not feel it with the tee box tucked away among the trees.
The green slopes gently from left to right and isn’t too tricky overall. This is probably the easiest hole on the course—so don’t screw it up!
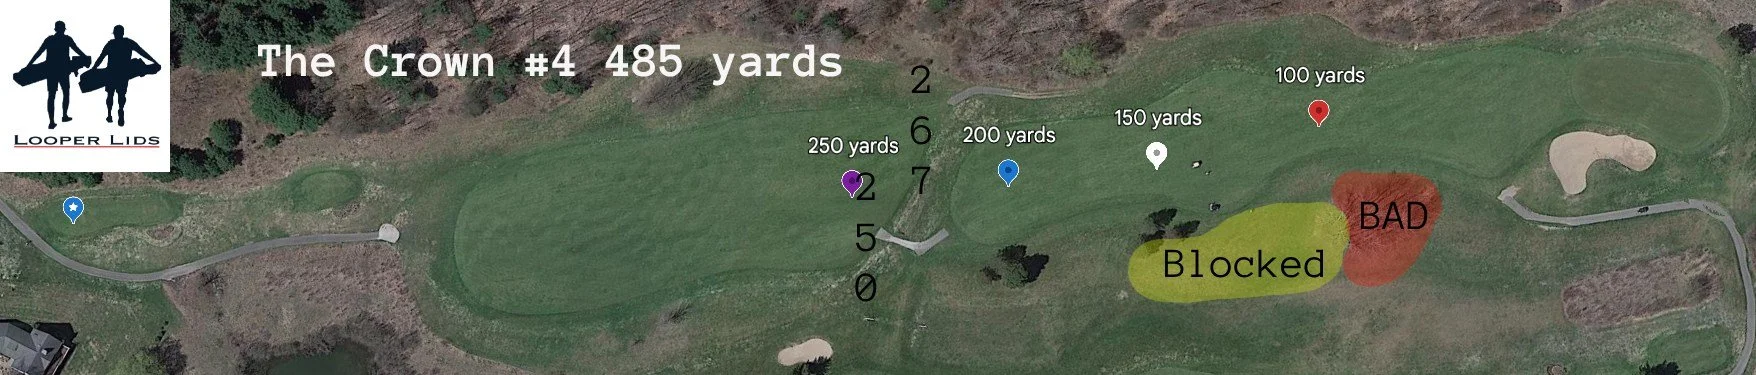
Hole 4: Risky Business
The second par 5 on the front is even shorter than the first, but a trench cuts through the fairway between 250 and 267 yards from the tee. I don’t feel confident carrying it every time, so I lay up short and live with the fact that I’m never going for this green in two. My go-to strategy is hitting 5-wood off the tee, then again for the second shot, which leaves me with less than 50 yards into the green. Even that might be a bit aggressive for most players.
If you check the overhead view, you’ll see the fairway widens and narrows in certain spots. The tightest area is between 115 and 75 yards from the green—and it’s definitely not where you want to lay up. If you need to lay back, aim for around 125 yards. But if you’re confident you can clear that narrow stretch, go ahead and let it rip.
The green complex sits about 10 feet above the fairway, so you won’t be able to see your ball land. The green slopes from left to right, with a ridge dividing the higher left tier from the lower right side. Be careful—missing left can lead to runaway chip shots you do not want to deal with.

Hole 5: Shape It or Play It Smart
Like the 2nd hole, the tee box on the 5th limits your ability to access part of the fairway unless you shape your shot. This time, pine trees lining the left side force you to aim up the right half of the fairway.
Luckily, there’s plenty of room to work with—up until about 280 yards, when the rough starts creeping in and the water hazard comes into play around 300 yards. I typically go with my 250-yard club off the tee to stay safe.
The green complex slopes from left to right and gives you more room to miss left than right. That said, missing left will leave you with a downhill chip—but that’s still better than ending up right of the green, which is trouble.

Hole 6: Where the Hell Do I Aim?
Easily the toughest hole on the front nine, the 6th is a dogleg right packed with trouble. One of the biggest challenges here is just figuring out where the hell you’re supposed to aim. The trees on the left close in fast and can totally block you from having any shot at the green.
What you can’t see is the pond lurking to the right of the fairway—it’s only 195 yards to reach. You can carry it, but it's 235 yards at the shortest point and up to 260 yards if you're aiming out toward the right.
Next time I play here, I’m aiming over the middle of the first bunker and hitting driver. That seems to offer the best angle while staying out of the worst trouble.
Once the hole starts turning right, the elevation drops about 10 feet from the 200-yard marker down to the green. The green itself is slightly elevated and slopes left to right and back to front. The right-side bunker also has some influence, causing a few putts to break right-to-left off of it.

Hole 7: Uphill Grind
I think this is my favorite hole on the front nine. At just 336 yards, you’d think it would be an easy one—but like my grandpa’s walk to school (both ways), it’s all uphill. From the tee to the green, you’re climbing 47 feet.
This dogleg left has bunkers between you and the green at about 235 yards. The smart play is to aim left and stay short of the trees, which are also about 235 out. Either way—stay short of that number. With the elevation, you could play it up to 250 yards, but don’t get cute.
From 100 yards out, the uphill adds the equivalent of 7 more yards, and you’re usually dealing with a hurting wind coming from the left. The false front isn’t too aggressive, but if you pair a spinny wedge with that wind, the ball is going to zip back more than usual.
If you’re going to miss, miss right—not left. The green slopes back to front, but only about 3 feet total. I always feel like I’m not quite aggressive enough with the downhill putts here.

Hole 8: Right.. is wrong
Out of all the green complexes, I think this one is my favorite. But on your way to that favorite green, make sure not to miss right. After the carry, the right-side bunkers are about 225 yards out, and from there you’ve only got 17 yards of rough before your ball might fall off the face of the planet. An absolute no-no.
Because of that, you need to favor the left side. Over there, you’ve got some trees way left and a bunker just off the fairway at 252 yards. Since this hole is only 350 yards, I usually hit my 230-yard club to give myself plenty of room to miss left. Even if I push one way out there, I should be far enough back to have a clear shot over the trees.
The green complex is shaped like a triangle—narrow in the front and widening toward the back tier. If the pin is in the back, make sure not to miss long. I’m not a fan of the right bunkers either... so I guess that means I prefer to miss left here.

Hole 9: Tough but Fair
The tougher of the two par 3s on the front, the 9th faces the opposite direction of the 3rd hole and typically plays into the wind, which only makes it more challenging. At 165 yards, this hole forces you to hit a quality shot; anything less and you’ll be facing a tough up-and-down from almost any miss.
The green sits a few feet above most of the rough, and the worst miss is in the front bunker or long left in the trees. Your best miss is short—at least you’ll have a chance to save par.
The green slopes from the back-right corner to the front-left corner and can get pretty quick in places, so watch out for those downhill putts!

Hole 10: Bottleneck
After fueling up at the turn, you’re greeted by a shorter par 4 that might have some players thinking about hitting less than driver. The hole plays slightly uphill and usually into a hurting wind, but there’s no need to try to rip a drive longer than 250 yards. The widest part of the fairway is between 150 and 110 yards out, and it’s about 50 yards wide. Once you’re inside 100 yards, the fairway narrows by half. With long grass creeping into play on the left and a fairway bunker on the right, trying to hit into that bottleneck is simply not worth the risk.
After an ideal ~240-yard drive, you’ll be left with a wedge into a back-to-front sloping green. The most memorable feature of this green is the spine running through the middle, which divides it in half. Aside from that, the green primarily slopes from right to left, but there are some areas that don’t follow the rules.
A miss long here leads to a very delicate chip shot, so keep that in mind if you’re between clubs on your approach!

Hole 11: A Tough Test
The 11th is one of the more memorable holes at The Crown, and mostly because of how tough it is. This dogleg-left par 4 may angle left, but everything else about this hole screams left to right. To put it into perspective, the left side of the fairway sits 10 feet higher than the right, and keeping your ball from rolling into the right rough is tricky without a left-to-right shot shape.
I think driver is fine, but your line should be where the left rough meets the fairway. If you push it a little too far right, you’ll run into some tree trouble—but not until about 280 yards.
Not only will you face an awkward left-to-right lie on your approach, but the green sits 25 feet above the fairway, making club selection tricky. The general wind tends to help, so I add about 8 yards for the uphill shot, but unless the wind is really strong, I don't usually reduce my target distance. With this much uphill, the wind doesn’t play as much of a factor.
The green complex slopes consistently from left to right and back to front. Be sure not to miss left around the cart path, though—I’ve seen some gnarly bounces off that path, and from there, you’re left with a nasty downhill chip shot. That said, right isn’t exactly a safe miss either.

Hole 12: Positive Thoughts
The 12th is a pretty visually intimidating hole. Between you and the green is a deep ravine that shouldn’t come into play, but as we all know, human error can be a fickle thing. The proper bailout on this hole is left—anything right or long of the green is just asking for trouble.
The green complex is relatively flat, with only a single foot of elevation change. Even though this is a shorter par 3, don’t lose focus—one bad swing here can quickly derail your entire round.

Hole 13: The crown of The Crown
I can easily say that this is my favorite hole at The Crown, and it’s all because of the topography. From tee to green, the hole drops a little over 40 feet, and the green is hidden from the teeing area. The tee box starts high and drops dramatically before you reach the fairway. From there, it climbs back up about 10 feet until the fairway flattens around the 150-yard marker. If you're outside of 170 yards, the green is still hidden behind the elevated fairway.
The fairway starts to slope toward the green around 135 yards out, so if you’re not a fan of a downhill lie, stay short of that distance. I typically hit my 230-yard club off the tee to keep things in check.
To the right of the fairway is a steep hillside that drops more than 20 feet and starts encroaching onto the 17th hole. Finding the fairway here is critical.
From the 135-yard mark, the green sits about 15 feet below the fairway. The green slopes from left to right and back to front, so expect your shot to release a little right when it lands. Make sure not to miss left, though—the bunkers are waiting there. A miss short and right gives you the best chance of getting up and down if you don’t hit the green.

Hole 14: The Domino Effect
The next three holes at The Crown are definitely the most interesting, and I’ve been trying to think of a single phrase to describe this stretch. I think I’ve landed on “the domino effect.” The shots required to do well here aren’t impossible, but if you start to stray just a little, things can snowball quickly. One bad shot can set off a chain reaction of poor decisions as you try to make up for it. Fingers crossed you're playing match play, or else you’ll need to take your medicine and aim for no worse than bogey.
The 14th is a true 3-shot par 5, and I never even think about hitting driver. The fairway ends at 260 yards, but I don't want to be anywhere near that distance. The fairway is at its widest between 200 and 230 yards off the tee, so I aim for that range. Don’t forget to add an extra 10 yards for the uphill when planning your club selection—my 230-yard club is typically the right choice for me.
You can’t afford to miss left or right, so hitting into the fattest part of the fairway is an absolute must.
Once the fairway ends, the hole turns sharply to the right and starts to widen as you approach the green. The hardest shot on this hole is the layup. The giant ravine that the 14th doglegs around is incredibly intimidating, especially with massive trees growing out of it and blocking your view of the rest of the hole.
Since golfers tend to get intimidated by the ravine, they often subconsciously aim too far left and end up in the left trees, which are far more in play than most realize. From the 300-yard marker, it's only 175 yards to carry the last bunker—this should be the goal for anyone trying to reach the green in 3. The fairway continues to widen, but only after you’ve reached the 100-yard marker.
The green complex has three distinct tiers, with each tier becoming more difficult as you move toward the back. Missing short is far better than missing long, so keep that in mind when choosing your club.
Good luck!

Hole 15: Risk-Yes, Reward-Ehhh
The 15th is one of the few reachable par 4s in Michigan where I’ve never attempted to hit my driver. To me, it just isn’t worth the risk. The hole offers two options off the tee: you can either lay up to the elevated fairway or go for the green, which is about 260 yards to the front edge.
As I’ve mentioned, the goal here is just to hit the fairway. A marshy area protects the front of the green, and the elevated green falls off on three of its four sides. The only side that doesn’t have a drop-off has a couple of bunkers, which set you up for an almost guaranteed downhill shot to a sloping green. Honestly, it’s just not worth it.
The fairway is level with the tee box but requires a carry of at least 185 yards on the left side and 200 yards on the right side. If you hit your tee shot beyond 240 yards, you'll bring trees into play. I prefer to hit my 210-yard club toward the left half of the fairway.
From here, you’re left with a downhill shot of less than 100 yards. It’s not an easy shot, though, so aim for the right half of the green, as it’s much wider than the left. Just like the last hole... Good luck!

Hole 16: Downhill & Dastardly
The final hole in the "Domino Effect" is a short, downhill par 3 that doesn’t leave much room for error. Playing almost 50 feet downhill, this hole fits the narrative that downhill par 3s are often tougher than flat or uphill ones. The longer the ball is in the air, the more time it has to float off-line or be affected by the wind.
With a 50-foot drop, play about 10 yards less than the distance on the scorecard. Be mindful of the wind, as the prevailing wind usually has a bit of a hurt to it.
The green slopes from right to left, with a bunker on the left side. Like many holes at The Crown, it’s better to miss in the left bunker than to face a tricky downhill chip shot. The front portion of the green is wider than the back, so if you're between clubs, opt for the shorter of the two.

Hole 17: Real Straight-shooter
After the challenging stretch of holes 14-16, it’s a relief to face a straightforward par 5 where you can hopefully make up for that almost assured drop shot or 7. On your tee shot, you’d prefer to miss right rather than left, especially if you can get past the last pine trees at 240 yards.
This hole usually plays into the wind, so it’s probably not reachable in two for most golfers. Let’s talk about where to lay up. The green complex slopes pretty drastically from right to left, and missing anywhere short or left of the green is a bad spot to be. Because of this, I tend to leave myself a full club for my approach shot.
The fairway tightens quite a bit inside 125 yards. It’s 41 yards wide at 125 yards but only 23 yards wide at 100 yards. If you’re laying up, I’d suggest staying in the 125-yard range to give yourself a better chance.
If you have an opportunity to go for the green in two, be cautious about missing too far left. Left is the better angle into the green, but there’s not much room to work with. I can’t tell you how many times I’ve hit a solid drive and then missed left into the tall grass. I usually manage to save par, but it’s tough to hit a good approach shot from the weeds.

Hole 18: Finish like Royalty
The finishing hole at The Crown is one of my favorites. Unlike El Dorado or Champion Hill, it’s not the most difficult hole on the course, but it requires you to hit a quality wedge shot over a well-defined water hazard. But let’s not get ahead of ourselves just yet.
The tee shot is downhill with plenty of fairway to work with until it ends at 270 yards. On the left side of the fairway is a long, narrow bunker, which is 230 yards to carry. Beyond that is the driving range. I can’t remember if it’s marked OB, but aiming your tee shot in that direction isn’t the best play. Don’t get me wrong, I’ve played from the driving range before, but the ground is uneven, and your view of the green is likely blocked by a hill.
The smart play is to hit something around 250 yards straight ahead. From there, you’ll have around 120-140 yards left, depending on whether you’re on the left or right side of the fairway.
The green slopes from back to front and left to right. With water short of the green, missing long is a safer option, though it may bring the back bunkers into play. Again, missing long is better than coming up short and finding the water. Just be cautious when hitting a sand shot back towards the water – I’ve seen people opt to putt out of these bunkers to avoid the dreaded forehead bunker shot, but that’s not always necessary.
Conclusion:
All in all, The Crown is a good time for players of all ages and skill levels. There’s a nice variety of golf holes, and I wouldn’t say any two feel too similar. I think they used the terrain pretty well, and like most courses built within a development, the best views are reserved for the real estate—not the golf course itself.
I totally understand how they can justify charging 33% more than their closest competition, Elmbrook. That said, I can promise you I’ll still play Elmbrook way more than The Crown this summer.
Also, I have to say—the removal of the stuffed burgers from the restaurant was a major disappointment the last time I visited. I know it has nothing to do with the golf course, but man, I used to love that bacon, feta, and BBQ sauce stuffed burger.
Thanks for reading—now I’ve gotta go figure out where else I can find a stuffed burger in Traverse City!